When it comes to interior design, the delicate dance between functionality and aesthetic appeal often leads to the discovery of extraordinary works of functional art. Among these treasures, the rhinestone candle holders stand are sure to bring light and sparkle to your home decor.
I love these candlestick holders because they can hold both votive candles or pillar candles and are sure to add both light and sparkle to any dinner table. They also make great gifts for that friend who loves handmade gifts. For this project, I love that the rhinestones are placed on glass. This technique can be translated to pretty much any kind of decor like glass vases, event decor, wine glasses and more. If you want to live in fashionable modern homes, the secret sauce is in the decor. Once you’ve added your runner carpet and your artificial flowers, it’s time to start adding some bling to the space.
What you’ll need to create a custom DIY rhinestone candle holders set
- Glass candlestick holders
- Rhinestones
- Strong adhesive
- Toothpicks
- Wax Pencil
- Rhinestone tray
- Rubbing alcohol pad
*I love ordering supplies on Amazon because there are tons of selection results, free shipping (typically ships within a few business days) and it’s never a final sale so if you change your mind, you can send the supplies back. Just note that delivery times vary and keep an eye out for low prices during prime day sales. Be sure to wait for free shipping or a low cost flat rate. Check out my favorite items on my Amazon storefront. You’ll find a full page of all of my favorite things!

The full details to create DIY rhinestone candle holders
- Start by placing the candlestick holders onto their sides.
- Using your alcohol prep pad, wipe the glass thoroughly to remove any grease or oil.
- Using your toothpick, add a thin layer of glue to the glass surface.

- Place your rhinestones or crystals into a rhinestone tray and give it a brief shake. This will flip the rhinestones onto their proper side.
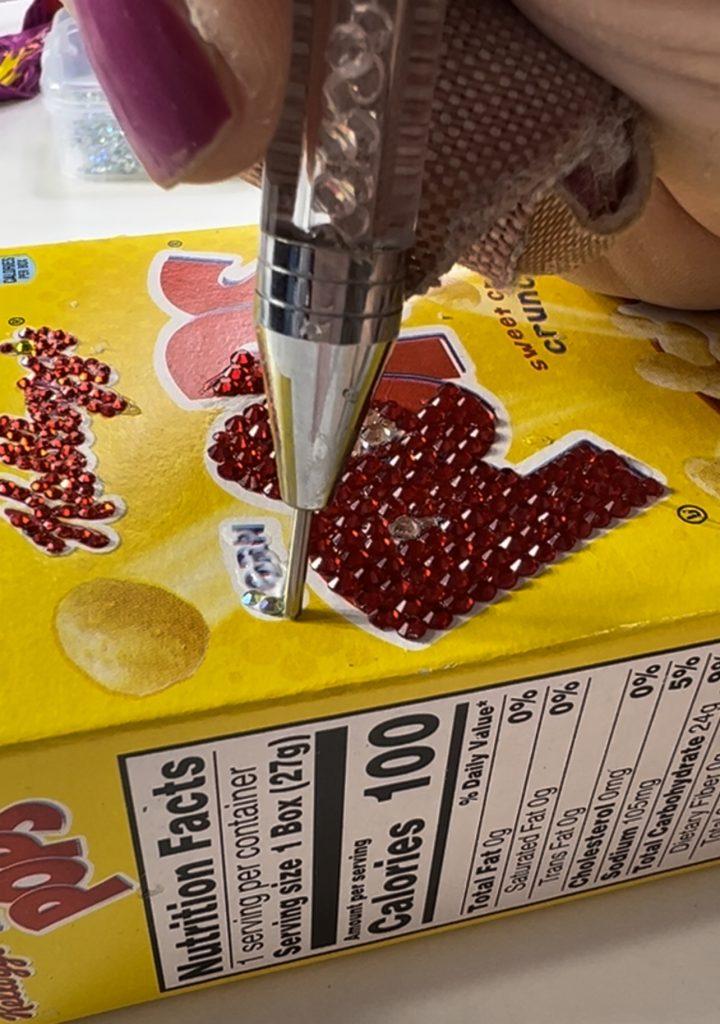
- Using your wax pencil, pick up a rhinestone and press it into the glue. Make sure to give it a firm press to make sure the rhinestone doesn’t slide.

6. Continue adding rhinestones in any pattern or color combination. Once you complete one side of the glass candlestick holder, skip to the second glass candlestick holder to give the first one ample drying time. This step is important.

Continue alternating sides until both have rhinestone patterns added. On my glass rhinestone candlestick holders, I also added rhinestones to the top of the glass.

7. Allow the candlestick holders to dry completely before placing them on wood floating shelves or your home office desk. You do not want the rhinestones to stick to the surface. As far as the adhesive goes, you’ll want to treat this project as you would any other project that utilizes glue; allow it to dry and cure for several days before using. Once you are happy with your glass rhinestone candlestick holders, feel free to either place them on a bohemian style table runner or in terrarium display boxes – give them a special place in your home.

Some ideas for your rhinestone candle holders
- Feel free to use the same colors as your handmade rugs
- Instead of candlestick holders, try making colorful earrings or a women’s purse handbag
- If you love to paint, perhaps add a hand-painted design to the glass prior to adding rhinestones
- For extra sparkle, place your rhinestone candlestick holders near a new window or allow them to be the central piece of art on your dining room table.
- To make a bold statement, add striped taper candles or scented candles
- Create a series of candlestick holders, including a votive candle holder
- At holiday time, make your rhinestones in the pattern of candy canes – red and white stripes
- Gift these for a special day or a birthday gift
- Add rhinestones in the pattern similar to a colorful peacock footstool
- Use battery operated candles rather than the more flammable alternative
- Add some decorative throw pillowcases in the same color scheme
- Use them outside with your wood outdoor patio for an extra pop of color
- Feel free to use a pattern; honeycomb, linear, or scatter to give it a personal touch
- Incorporate a colorful peacock motif (you can look to a peacock print for inspiration) into your bedazzled creation
- If you cannot find glass candlestick holders, feel free to use stainless steel
Now that you’ve created your stunning, sparkly candlestick holders, place them on your home balcony garden for extra positive energy. Before you know it, that home you’ve worked so hard to curate will now resemble a luxury hotel. Use them in your kitchen room, dining room, or on your coffee table. This unique tabletop decor is sure to wow all of your guests!
FAQs about making DIY rhinestone candle holders
Can I use any type of candle holder for this project, or are there specific ones that work best?
While you can technically bling any candlestick holder with rhinestones, we recommend using glass or stainless steel since they’re not flammable. Its smooth sides provide an ideal surface for adhering rhinestones.
What size rhinestones should I use for my rhinestone candlestick project?
The size of the rhinestones you use depends on your personal preference and the design you have in mind. For intricate designs or smaller pens, opt for smaller rhinestones like SS6 or SS10. For bolder designs, larger rhinestones like SS16 or SS20 can make a statement.
What type of adhesive should I use to attach the rhinestones to my candle stick holder?
We recommend using a strong, clear-drying adhesive specifically designed for rhinestones and jewelry making. My favorite is Liquid Fusion, but E6000 adhesive is also a popular choice among crafters for its strong bond and versatility.
How do I create a pattern or design for my rhinestone candle holders?
You can create your design using rhinestone templates, which are available online or can be custom-made using design software like Cricut Design Space. Alternatively, you can freehand your design directly onto the pen barrel using a pencil or marker before applying the rhinestones.
Can I wash my rhinestone candle holders after they’re blinged?
While rhinestone candlestick holders are not typically designed to be submerged in water, they can withstand gentle cleaning with a damp cloth. Avoid soaking or scrubbing the rhinestones directly to preserve their adhesive bond and shine, and keep them out of extreme heat.
Can I use different colors or shapes of rhinestones for my project?
Absolutely! Get creative with your design by mixing and matching different colors, sizes, and shapes of rhinestones. Consider incorporating birthstone colors, gradient effects, or even adding charms for extra flair. The possibilities are endless!
Want to do more rhinestone projects? Check out this page!