
DIY Custom Bedazzled Tumbler Rhinestone Tutorial

DIY Custom Bedazzled Tumbler Rhinestone Tutorial
Who hasn't switched their plastic water bottles for stainless steel tumblers by now? They're a convenient and eco-friendly way to provide a steady stream of caffeine or a refreshing sip of your favorite cold beverages.
But wait, what if I told you that your tumbler could be more than just a cup for your daily dose of energy? You can transform your ordinary tumbler into a dazzling accessory by creating a custom rhinestone tumbler!
If you know me, you know I love to bling anything and everything! In this blog post, I'm sharing a step-by-step tutorial on how to make gorgeous rhinestone tumblers. Add the personal touch of a name to these rhinestone tumblers and it makes the perfect gift!
No more waiting 1-2 weeks for custom orders from Etsy when you can make these custom items yourself. Life's too short for plain tumblers - it's time to bring some bling to your daily sip of hot coffee in the morning!

Are you ready to bling it on?
Bring your designs to life and let your creativity truly sparkle with our comprehensive rhinestone course.
Materials
- Rhinestones (I'm using SS20 glass rhinestones)
- Rhinestone glue (I'm using E6000)
- Wax pencil
- Tumbler
- Painters tape
- Rhinestone tray
- Toothpick
What type of tumbler can you bedazzle?
There are different sizes and types of tumblers, so which are the best to bedazzle? You can add rhinestones to a stainless steel tumbler, double-walled acrylic tumbler, or even the tumblers that come with a reusable straw or stainless steel straw.
It's easiest to make a custom rhinestone tumbler with the travel mugs that don't have a handle. I chose to make a custom rhinestone tumbler with one like this one because it fits in my cup holder:
What type of rhinestones are best to bedazzle a tumbler?
If you're not in the rhinestone world like I am, you may not know that there are tons of different rhinestones types. There are resin rhinestones, glass rhinestones, acrylic rhinestones, and crystal rhinestones. Their appearances all vary in different lights and they all have a range of different rhinestone colors.
So which rhinestones are the best to use to bedazzle a tumbler? Glass rhinestones are a popular choice because they're high-quality rhinestones that really sparkle! I chose to use an SS20 stone size.
Make sure you don't use hot fix rhinestones for your custom bedazzled tumbler, because you need flat back rhinestones for the best results. I get some of my rhinestones from Amazon (linked above), but I get the bulk of my rhinestones from this incredible rhinestone online store. Use coupon code artbeat for 10% off all purchases!
What is the best rhinestone glue to use on a tumbler?
The type of glue you use to bedazzle your tumbler will make or break this project! You need a strong bond to make sure the rhinestones stay put through daily use.
Even if you hand wash your bedazzled tumbler and keep it out of extreme temperatures, you need a specific glue that's made for metal.
In my experience, the best glue is Liquid Fusion or E6000 to keep your rhinestones snug and secure. Liquid fusion is lower odor, but E6000 is stronger. Rhinestones have even made it through the dishwasher with E6000! (On accident)
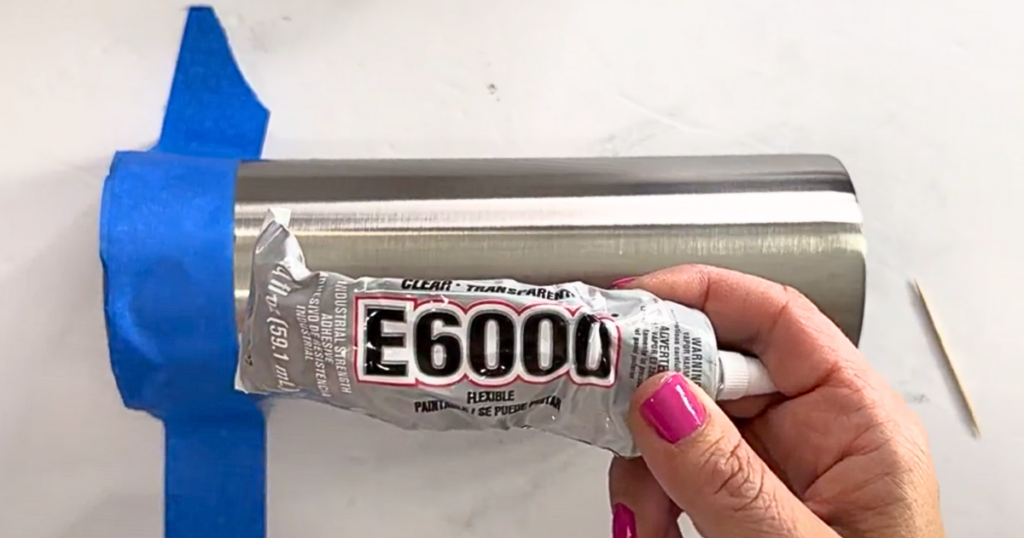
I'm using E6000 to bedazzle this stainless steel tumbler.
Check out the video below to see my full test of the best rhinestone glues for metal or this post for the best rhinestone glues to use in 2025.
How to bedazzle a custom rhinestone tumbler
**IMPORTANT** Prep your tumbler!
When you're working with tumblers, the first thing you'll need to do is prep. This is the most important part, so don't skip this for the best results!
You tumbler has been handled, packaged, and can have dirt, dust, and oil that could impact the strength of the adhesive. If you're bedazzling a plain stainless steel tumbler like I am, you may want to paint it a similar color to the stone color you're using, but that's totally optional!
1. Scruff the entire surface of the tumbler with a sandpaper block. Move is small circular motions, making sure to cover the entire area.

Rough the surface of the tumbler with a sanding block.
2. Wipe the surface of the tumbler with an alcohol prep pad to ensure you have a clean, dry surface.

Remove all dirt and dust from the tumbler with an alcohol wipe.
3. **PRO TIP** Remove the tumbler lid and use painter's tape to secure the tumbler to the table so it doesn't roll as you work.

Remove the lid from the tumbler.

Use painters tape to secure the tumbler so it doesn't roll while you're working.
If you want to add a custom touch like a personalization of name, you can add a vinyl decal to the tumbler to use as a template for the rhinestones.
You can also make a name sticker patch using rhinestone templates from a Cricut or other cutting machine, which is much easier than placing the stones by hand. I'm working on releasing a video on this soon - so keep an eye out for a step-by-step guide!
Bedazzle
4. Use a toothpick to apply a small amount of glue in a straight line along the edge of the tumbler. The adhesive dries fast, so work in small batches and don't make too long of a line.
Some people like to use squeeze bottles with a needle thin nozzle. In my experience, the nozzle clogs and they're hard to fill up. I prefer toothpicks but you can experiment and see what works best for you!

Apply a thin line of glue to the edge of the tumbler using a toothpick.
5. Using a wax pencil, press down on top of the rhinestones to pick them up. Press the back of the rhinestones onto the glue, adding a line of stones one next to another. Use some pressure to apply the rhinestones to make sure they're sticking to the metal, and not just the glue.

Use a wax pencil to apply the rhinestones in a straight line on top of the glue.
6. While the glue is still wet, use a flat surface to line up the rhinestones and make sure you don't have any hanging over the edge.

Use a flat surface to straighten the rhinestones while the glue is still wet.
7. Continue this process all the way around the edge of the tumbler until you have one complete line.
8. To make a honeycomb pattern, add a line of glue directly underneath your first row of rhinestones.
9. For the second row, place each rhinestone in-between two stones from the first row, forming a triangle.

For the next row, apply each stone directly in between the two rhinestones below to form a honeycomb pattern.
10. Continue this pattern around the entire tumbler. You may want to do this in a few sessions! If you want to add some personalization like a name, use a vinyl decal and place the rhinestones over it or use a Cricut rhinestone template. I placed the ones below by hand.
And now you have a gorgeous custom rhinestone tumbler! You can keep it for your favorite beverages, but I think these also make perfect gifts!

DIY custom rhinestone tumbler
Tips & Tricks
- Don't worry about it being perfect - the more bedazzling you do, the better you'll get at placing the adhesive and the rhinestones in the way that works best for you! There is no right way or wrong way to rhinestone.
- I find the best attachment method to be a wax pencil, but you can also use different rhinestone tools like wax pens. Check out this post on the best wax picker tools!
- You have about 5 minutes until the glue starts to set to adjust the placement of stones if you need to.
- The glue will dry clear - don't panic if you can see excess glue in between the stones as you're going.
- If you get glue on a rhinestone, don't waste your time trying to clean it off. Use tweezers or a rhinestone tool to remove it and add a new one.
Care instructions for your new bedazzled tumbler
Making a custom rhinestone tumbler is a labor of love! Use your bedazzled tumbler for hot coffee or cold beverages daily, but make sure to hand wash only to keep that sparkle looking brand new and avoid using water with extreme temperatures.
Want to make a bedazzled heart tumbler? Check out this post.