Smiley faces make everyone happy! Wearing a smiley face patch adds an extra dose of good vibes! So why not create your own colorful Iron-on Smiley Face Rhinestone Patch Appliques?! There are several ways to get this done and I’ll be breaking down the differences between the techniques.
Materials Needed:
Affiliate disclaimer: Although I stand by all of the products I use, I can receive a small commission from any products purchased via my affiliate links.
- Hotfix rhinestones in various colors (yellow for the smiley face, and other colors for any additional decorations) – look for free shipping
- Transfer tape for rhinestones
- Rhinestone template in the shape of a smiley face/happy face
- Rhinestone brush
- T-shirts or tank tops
- Heat press machine or iron
- Rhinestone flock
*I love ordering supplies on Amazon because there are tons of selection results, free shipping (typically ships within a few business days) and it’s never final sale so if you change your mind, you can send the supplies back. Check out my favorite items on my Amazon storefront. You’ll find a full page of all of my favorite things!
With rhinestone transfer designs, you will receive a piece of transfer tape with hotfix rhinestones already embedded. These are ready to go and use, however, they are one time use transfers. If you think you will need more, you can either purchase a wholesale amount of rhinestone transfers or create your own.
If you’d like to create your rhinestone transfer, you’ll either need to purchase a rhinestone template (on Rhinestone Flock) or. The best way to create your own is by using a vinyl cutting machine. Silhouette Studio has the ability to create rhinestone fonts, but Cricut Design Space has many designs ready to go. They do not have a rhinestone happy face on Cricut, but you can download one for free here. You can also purchase ready made templates here.
Want to learn how to create your own rhinestone templates for one, two, or even multicolor designs? Check out my Bling It On Digital Rhinestone Course to learn my trade secrets for saving time creating rhinestone art with templates!

Creating your own rhinestone template
Steps:
Design Your Smiley Face: Using Cricut design space or any type of design software, you’ll want to make your designs using circles in specific sizes to correspond to the rhinestones. From there, you’ll cut them on the rhinestone flock. If you’d like to learn more on how to do this yourself, check out my course on creating a rhinestone template. You will need to create two layers; one for the yellow rhinestones and another for the black. You can also purchase SVG files on Etsy for a small fee.
Prepare Rhinestones: Place the first rhinestone template onto a tray.

Pour the yellow hotfix rhinestones over the flock.

Use a brush in a circular motion until all of the holes are completely filled.

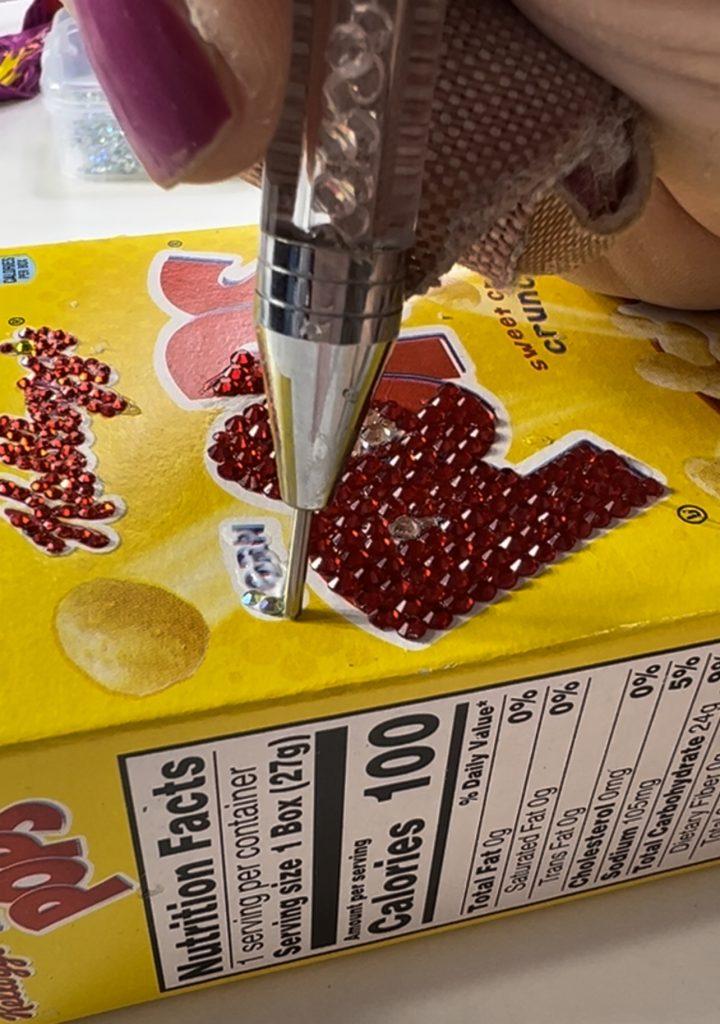
Add Transfer Tape: Grab a piece of transfer tape. Hold it like a taco – like it is dipping in the middle and place it on top of the flock.

Use your rhinestone brush and press down the transfer tape.

Remove the transfer tape and add the backing.
Repeat: Grab your next piece of rhinestone flock and add it directly on top of the existing flock. Pour the black rhinestones this time and use the rhinestone brush to spread them around.

Add Transfer Tape: Grab a piece of transfer tape. Hold it like a taco – like it is dipping in the middle and place it on top of the flock. Be sure to line it up exactly so that the yellow and black rhinestones do not overlap. Use your rhinestone brush to press down the transfer tape. Remove the transfer tape and add the backing.
Prepare Iron: Warm up the heat press. Adjust the heat press temperature to 340 degrees. Place a t-shirt or piece of fabric onto the heat press and heat it for 10 seconds. Next, place your rhinestone transfer onto the warm t-shirt. Add a teflon sheet directly onto the template to create a barrier between the heat press machine and the template. Press for 15 seconds. Let cool. Next flip the shirt over and press it upside down for another 15 seconds. Let cool again and remove the teflon and the transfer tape. Your rhinestone patches should be secure.
Iron on the Patch again: Press for another 15 seconds without the transfer tape.
Allow to Cool: Once you’ve ironed the patch onto the fabric, allow it to cool completely before handling it.
Test the Adhesion: Once the patch has cooled down, gently tug at the edges to ensure it’s securely attached. If any parts are lifting, repeat the ironing process.
Enjoy Your Patch: Once your patch is securely attached, you’re ready to show it off! Attach it to your favorite jacket, bag, or any other fabric surface you like.
Frequently asked questions (FAQs) about rhinestone patches:
What material works for iron-on rhinestone patches?
Rhinestone flock works best. People have created rhinestone templates using cardstock, but it doesn’t work as well. Rhinestone templates last a long time and can be used over and over again making them a great value.
Why isn’t my iron-on rhinestone patch sticking?
If your iron on the rhinestone patch isn’t sticking, it is either because you didn’t use hotfix rhinestones or because you forgot to remove the backing.
How do you heat press rhinestones?
You must have hotfix rhinestones to make this work. If you’d like more information on hotfix vs regular rhinestones, check out this post.
Creating your own rhinestone smiley face iron-on patch allows for customization and personalization, making it a unique accessory to add to your wardrobe or give as a gift. Have fun crafting!