
DIY Bling: Easy Rhinestone Christmas Ornament with Cricut

DIY Bling: Easy Rhinestone Christmas Ornament with Cricut
Nothing makes your Christmas tree sparkle quite like beautiful rhinestone ornaments! Whether you're in the mood to DIY some Christmas decorations or looking for a unique handmade gift idea, these rhinestone Christmas ornaments will bring some extra sparkle to your holiday season this year.
In this blog post, I'll show you exactly how to make these beautiful holiday ornaments. I used an initial, but once you've got the process down you can repeat it with any letter or simple image!

Are you ready to bling it on?
Bring your designs to life and let your creativity truly sparkle with our comprehensive rhinestone course.
Handmade Initial Rhinestone Christmas Ornaments
Affiliate disclaimer: Although I stand by all of the products I use, I can receive a small commission from any products purchased via my affiliate links.
What you’ll need:
Vinyl (I use metallic, but you can use any type)
String/ribbon to hang the ornament
How to Make Handmade Rhinestone Christmas Ornaments
Make a template using the Cricut
IIf you've been searching all over for the perfect rhinestone appliques and just can't find what you're looking for, you're in the right place! You can make your own rhinestone templates using a Cricut and hand place the stones on top by hand.
Once you get the process down, you'll be able to make unlimited rhinestone designs! Follow these steps to make an initial template, or use the same process with a festive design like a rhinestone snowflake ornament for a winter wonderland or Christmas tree!
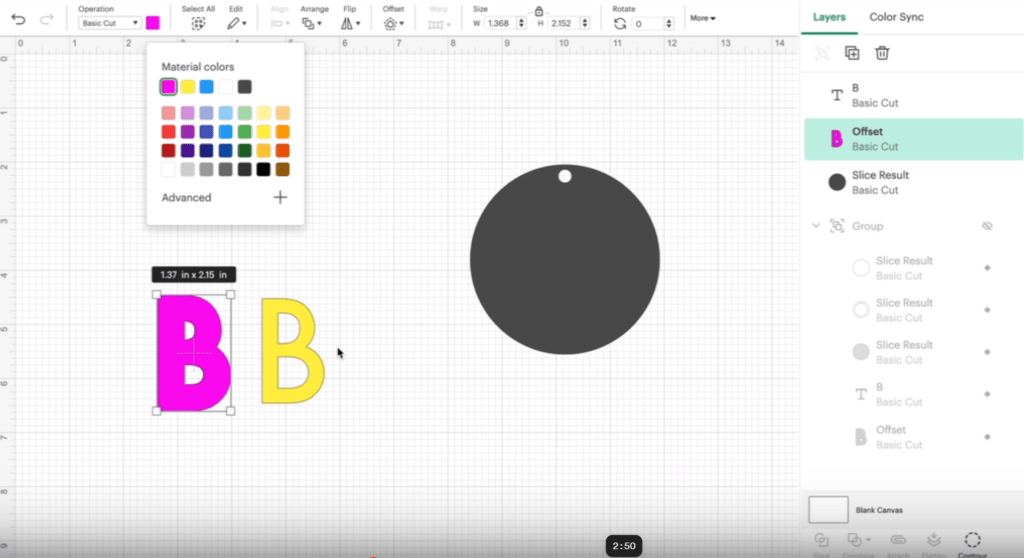
1. In Cricut Design Space, make a shape that matches the size of your ornament. the size I used for this tutorial was a 3.5 inch circle.

Select a color to match your rhinestones. For this tutorial, I’m using blue.
2. Make a smaller circle .25 inches in diameter for the hole to tie the string though. Place it at the top of your shape. (It’s okay if it doesn’t line up exactly with the hole on the ornament, as long as you can get some string or twine through!)

3. Select both shapes and click “slice” so the hole for the string will be cut out of the shape of the ornament.
4. For the initial, type the letter of your choice in the font you want to use. (I used Futura) Change the color to match your stone color.

For this tutorial, my letter is yellow.
5. To create an outline, select the letter and click “offset”. Then drag the slider to set the outline size and click apply. Mine is set at .111.

This creates 2 layers – select the color you’d like for your outline layer. (I’m using pink)
6. To create a border for your shape, make another shape of the same size and then create a smaller shape within.

Make sure the smaller shape size doesn’t cover up the hole that will be sliced for the string.
Select both, click align, and center to center the larger and smaller shapes together.
With both selected, click “slice” to cut the smaller shape out of the larger shape. Select the color you’d like that matches your rhinestones.

Drag the border on top of your main shape. Select both, then align, center, and slice.

Now you should have your main (smaller) shape and your outline/border

7. To put it all together, place the border around the smaller shape, move the letter and outline onto it, highlight everything, and click “align” then “center”

If your letter is moving behind the ornament, click “align > bring to front”
8. Now you’re ready to cut! Click “make it”.
You DON’T need this to be mirrored.
Select your type of vinyl. I’m using metallic vinyl.
Select “more pressure” and once your vinyl is loaded onto the mat, click “cut”.

9. Cut out, weed, and put all of the parts of the ornament together using transfer tape

Don’t worry if it’s not perfect! The rhinestones will cover any imperfections.
10. Use transfer tape to place the design template onto your ornament, lining up the hole for the string as much as possible. Don’t worry if it’s not perfectly lined up as long as you can fit some string or twine through!

Add the Bling!
11. Now for the fun part! Hand place the rhinestones onto the ornament using your adhesive and a wax pencil. (I’m using liquid fusion glue) Use your favorite method of rhinestone placement for each part of the design.
If you’ve never hand-placed rhinestones before, check out my tutorial on how to make a custom bling tumbler for my tips & tricks on rhinestone application!
Using a toothpick, place a small amount of adhesive on the ornament. Add the stones one at a time with the wax pencil, pushing down to secure them to the vinyl. You have about 5 minutes of working time to move the rhinestones around!
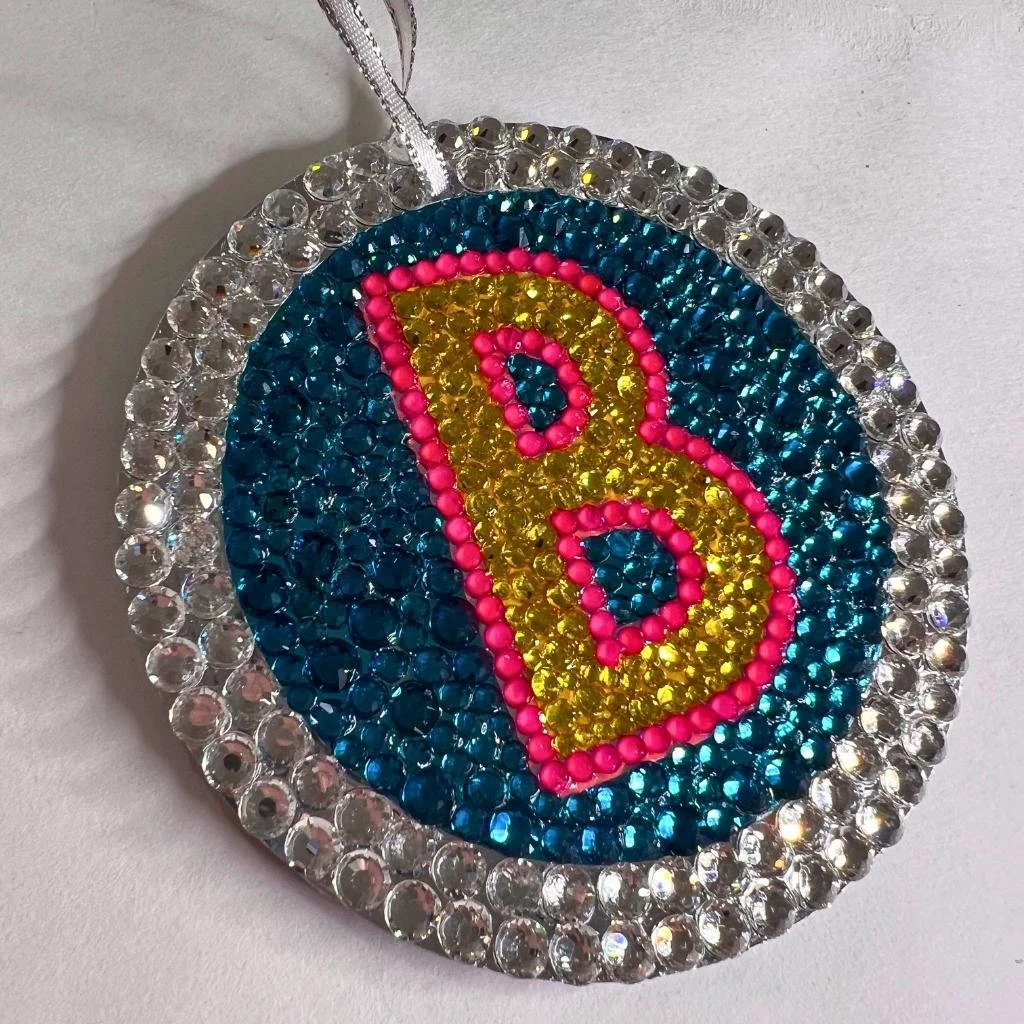
The methods and rhinestones I used:
The honeycomb method with crystal rhinestones for maximum bling on the silver outline.
The scatter method with aquamarine blue rhinestones for the background.

The line method with pink rhinestones for the outline of the letter “B

The scatter method with yellow rhinestones for the inside of the letter “B”

12. The last step is to just add some string, ribbon, or twine and tie in a loop for easy hanging on the Christmas tree!
The glue will take 48 hours to dry and several days to fully cure, so be careful with your finished product!
I can't get enough of these gorgeous rhinestone ornaments! These beautiful treasures are the perfect addition to your Christmas tree that will sparkle for years to come!
Or better yet, use this tutorial as thoughtful handmade gift idea. Handmade home decor with a festive touch is a heartfelt way to show friends or family you care, and so much better than gift cards!
Want to make more DIY holiday decor that sparkles? If you love making your own home decorations, try this rhinestone Christmas stocking tutorial. Or check out these easy Christmas ornament crafts.