
Lazy Susan Making – How to Make One In a Few Easy Steps

Lazy Susan Making – How to Make One In a Few Easy Steps
Ever since I was a child, I have always loved lazy Susans. I love making functional art with my classes and this one was a huge hit! If you've always wanted to know how to make your very own lazy Susan, this is your chance!
Making a lazy Susan isn't as hard as you'd think. You definitely do not need an orbital sander or a circle-cutting jig. With a few basic supplies from either Menards, Lowes, Home Depot or Amazon, you can make the whole thing in just a few hours.
If the teens and tweens in my classes can do it, you can definitely make one for your dinner table!
Supplies you'll need to make a lazy susan
Affiliate disclaimer: Although I stand by all of the products I use, I can receive a small commission from any products purchased via my affiliate links.
Wooden circle (I like the 12" size)
Drill and Drill Bits or screw driver
Painter's Tape
Chalk paint or heavy body acrylic
Screws (see recommendations for hardware)
Stencils (optional)
Drop cloth
Rag or lint free cloth
Pencil
Straight edge or T-square
*I love ordering supplies on Amazon because there are tons of selection results, free shipping (typically ships within a few business days) and it’s never final sale so if you change your mind, you can send the supplies back.
Check out my favorite items on my Amazon storefront. You’ll find a full page of all of my favorite things!
Basic steps for making a lazy Susan
1. The first thing you'll want to do is to cover your dining table, dining room table or craft room table with a thick drop cloth or table covering.
2. Pick up a wooden circle at your local hardware stores or from Amazon. I like the 12" but make sure that will fit inside your kitchen cabinet if that is where you plan to display it.
3. Flip the wooden circle. Use a straight edge ruler to mark off the middle of the circle. Since the lazy Susan will be as close to a perfect circle, you'll want to be sure to mark off the middle so that it isn't off balance when you add the lazy Susan bearing.
The easiest way to do this is to draw three chords. You can find a tutorial here. I'll be honest, though, when I make these with my classes, we estimate and nine times out of ten, the lazy Susans come out balanced and beautiful.
If you look from the top of your lazy Susan down, you should be able to see if the center hole is in the right place. Also, we are going to be covering the center hole with the lazy Susan hardware.
4. The next thing you'll want to do is to take the lazy Susan hardware out of the packaging. Place it in the center point of the wood round. The lazy susan turntable hardware comes with excellent instructions.
The best way to mark off where you'll want to drill is to color in each of the holes on the bottom plate. This will give you some guidelines for drilling.
5. Mark off where you want the lazy Susan hardware to go. Then you can drill shallow holes.
6. Next you'll want to drill into the wooden round to make a small hole. Do not drill too far into the wood otherwise you will have a hole in the wood round.
Check to be sure that the drill bit is the right size for the screws included in the lazy Susan hardware packaging. You're really just making screw holes to add the scews in after you finish painting.
I have found that it is a better choice to add the ball bearing hardware at the end of the project so that the lazy Susan doesn't move when you are painting. But getting the holes ready before is a wise idea.
I do not recommend drilling the holes at the end of the project just in case you miscalculate and drill all the way through.
7. Sand your wooden round to remove any oils or factory finishes.

Smooth out any rough edges by sanding
8. Gently wipe down the freshly sanded wood.
9. Add a layer of primer - be sure to work in thin coats, moving the brush in the same direction until the entire wood round is coated in primer.
10. Add a second layer of primer if necessary. I have found when making these in my classes that it is not entirely necessary to add a second coat of primer unless you can still see the wood showing from behind.
11. Now it's time to get creative! I recommend drawing out your design in advance.

Once the lazy susan is primed, the student sketches the design onto the wood
12. Paint the entire background color or add painter's tape to make crisp lines. YOU are the artist - make it the lazy Susan of your dreams!

Applying acrylic paint with a makeup sponge
Tip: One quick and simple trick for adding painter's tape. After you place the painter's tape onto the primed surface, add a layer of acrylic medium over the painter's tape. Let dry completely before adding your next paint color.
Side note: I do not recommend using spray paint for this project because it tends to drip, is inconsistent and unpredictable. Using an air brush, however, should work well.
13. Once your background is complete, feel free to add details using stencils or hand painted designs.
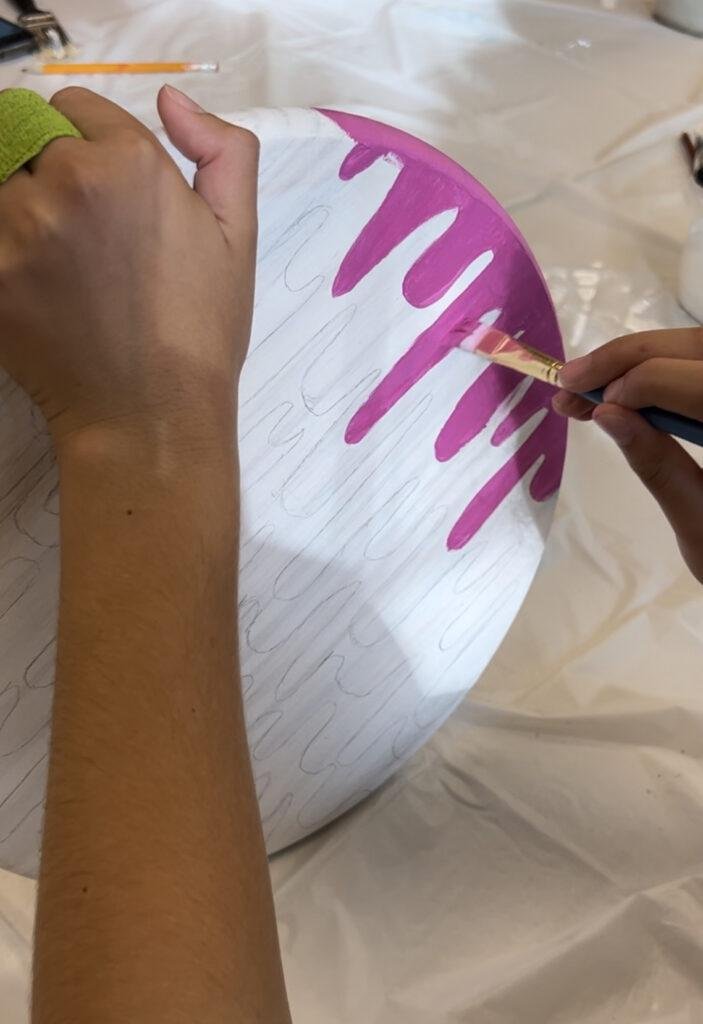
Adding paint to the design

Screen stencils work great on lazy Susans
14. Now that you've painted your lazy Susan, begin adding Polycrylic to the top to seal the freshly painted surface.
Do not skip this step. I've read online that you can use Mod Podge, but I would recommend using the stronger stuff so that it has a durable finish.
Follow the manufacturer's instructions regarding drying time.
15. Ok, you've come so far on this somewhat easy DIY lazy Susan. But you're not quite done yet. For the final step, you will begin adding screws to the mounting holes. You can use a hand-held screwdriver to attach the lazy Susan hardware.
The great thing about the hardware is that it includes everything - from the ball bearings and the pie plates - you will not need to purchase anything else to make this easy DIY project! J
ust be careful with the access hole and be sure to use the screws they've included for easy access. It would be so disheartening to come this far and then accidentally drill a hole!
So now that you've adding your hardware, the next step is actually the most fun! You get to decide what to do with the lazy Susans!

Student made lazy Susan
What to Do With Your DIY Lazy Susan
Are you going to put it into your home office for rotating office supplies?
Or perhaps you'll add it to the kitchen island for spices and condiments. Maybe you plan to use it for rotating storage space in your kitchen corner cabinet or put it on the kitchen table or any tabletop and use it for food items
Some of the kids in my class used their's for art supplies in the craft room which I think is so cool. They added a few cups, put some adhesives like super glue and Elmer's and a bunch of markers and crayons for easy access.
Whether you're leaving it out on the table top or hiding it under the kitchen counter, you'll feel good knowing you made this!
Just thought I'd mention this in case you're interested in a more simple DIY. I have seen people on YouTube make lazy Susans using a fidget spinner, a pan and a second pan from the dollar store. You can totally try this method, but it doesn't seem as stable to me.
Also, Ikea stocks inexpensive Lazy Susans if you prefer to not do any drilling.
I'd also like to mention that you can totally make your own by cutting wood with a circle jig and using a roundover bit and other fancy stuff. I really wanted this to be a simple project. I know my audience and extensive woodshop lessons are not for me!
The world is your oyster - but please let me know in the comment section how you plan to use this simple DIY lazy Susan!
If you love painting, but not quite ready for using pilot holes and pan head screws, consider this great project. The shaving cream marbling is also great for display! And then next time you can go for something more complicated like a lazy Susan.