I know, these pom pom makers look super intimidating! Fear not, if my 4th grade class can make beautiful pom poms, you can, too! I am very passionate about the Clover brand pom pom maker (they do not give me any money to say this) mostly because of how easy it is to use.

What you need to know about the clover pom pom maker
First things first, when shopping for pom-pom makers, there are lots of choices. I’ve seen wooden makers and u-shaped arches, but I have had complete success using the clover pom pom maker because once you get the hang of it, you’ll be making a wide variety of decorative pom poms. I even made one of them to look like my friend’s dog!
I highly recommend purchasing the complete pom-pom maker set because then you can create craft projects using beautiful pom poms in all different sizes. The reason the clover pom-pom maker is so successful is because once you get the hang of it, you’ll have near perfect pom poms every time (I say near perfect because I completely reject perfectionism in my art)!
If you do end up buying only one size, I recommend the large set because the learning curve is a bit easier – especially if you have issues with fine motor skills – I do not live the tiny makers or the extra large ones to use with kids so I usually leave those at home when teaching pom pom making,
What do I need to make a pom-pom?
- Pom Pom Maker
- Sharp Scissors (personally I think the smaller scissors cut much better than the larger ones when making this project)
- Yarn (not to thick when starting out)
How to use a Clover pom pom maker:
Below you’ll find step by step instructions for creating this fun craft project. But in the meantime, I want to walk you through the anatomy of the clover. I know this sounds silly, but understanding the parts will help you on the road to success. Watching this video will give you a visual explanation (I am a visual person so I find watching the video to be more helpful than reading the step by step instructions – but how you learn is entirely up to you!
Full video tutorial on how to use the clover pom pom maker
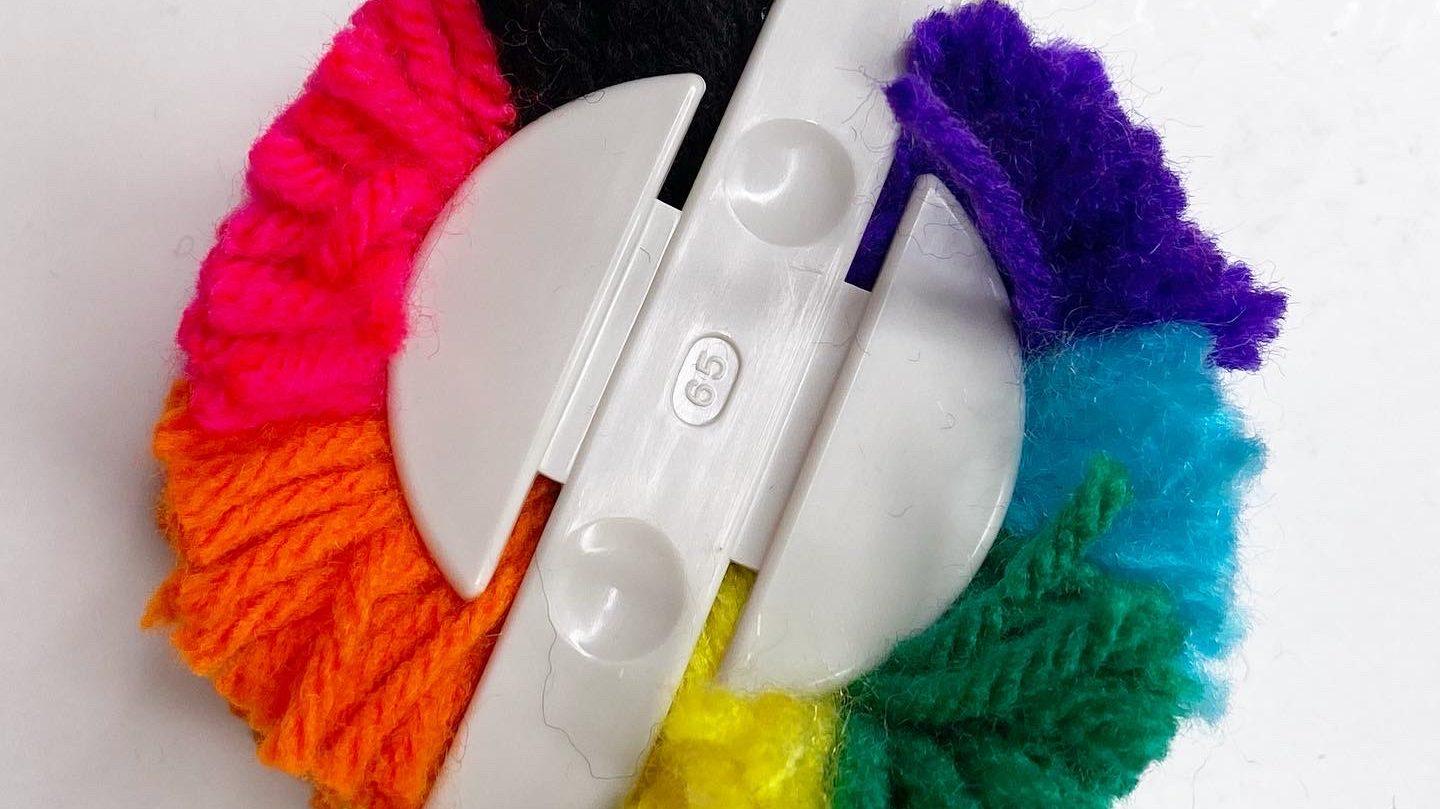
The clover has two sides that open up horizontally. Each one has what I like to call “legs.” The legs are the side arches that open and close from a single point. Each side has two legs so the pom pom maker has four legs in total.
The clover also splits apart from the middle. I mention this because oftentimes kids think that they’ve broken the pom pom maker when in reality, this is a very important part of the process. I’ll get to that soon…
How to make perfect pom-poms using the Clover pom pom maker:
- I recommend starting on one side of the maker and keeping the other two “legs” closed together (this is VERY important because if they’re separated, they will not create a pom pom. Start on one side of the pom pom maker and begin wrapping your yarn again and again and again. I usually test every few minutes to see if I can easily close the pom pom maker. If it opens and closes too easily, you still need to keep wrapping your yarn! Once it feels snug when you close it, close that side and keep it closed.
- Open the other two “legs” together. You can either cut the yarn at this point or have the yarn jump over the middle. Wrap that side in the same exact way…wrapping over and over and over again until it feels snug when you close it.
Clover pom pom is ready to cut
- When both sides look even, you can begin cutting. Start in the space between the two “legs” and slowly cut though the yarn using a sharp pair of scissors. The yarn will stay in position because of the middle white part holding everything in place. Cut all the way through one side and then cut through the other side.

- Once you’ve cut all the way through, do not open the legs because everything will fall apart. Trust me, I learned this the hard way! Grab one long strand of yarn and pull it between the newly cut “legs” and tie a knot. I like to tie my knots very tightly – sometimes two or three times until I feel everything is secure enough to stand the test of time. With children, it is sometimes easier to use a pipe cleaner in twist tightly.


Clover pom pom maker with the legs open
- Now you can pull apart the two white sides – sometimes you have to pull hard. Don’t worry – you will not break the pom pom maker! Releasing both sides will expose your new pom pom!
What can you make using your clover pom pom maker?
There are so many fun things you can make using your clover pom pom maker. From home decor accessories to pom pom earrings, the possibilities are endless. I even made a replica of my friend’s puppy using the pom pom maker! You can make fruit, veggies and pumpkin pom poms, too!

If you’re still not ready to make the investment, you can totally make pom-poms using a single piece of cardboard. Here’s a tutorial I did to make pom poms the old school way. Either way, I am sure you will have a fun time making yarn poms – once you start, it is hard to stop!
One other idea is to make pom poms using fabric strips – this gives you a totally different appearance, but still really fun to make!
As always, use my email address [email protected] if you have any questions!
Happy Crafting!