
How To DIY A Fake Cake With Spackle: Full Tutorial

For my son's birthday this year, I decided it would be so much fun to make a realistic faux cake and pretend that it was the real deal. I love how pretty cakes are, but I don't love making them because I work so hard on all of the details and then everyone eats it! Does anyone else feel my pain??
I'm also a sucker for a creative project that doesn't involve calories but still satisfies your sweet tooth for craftsmanship. Enter the world of fake cakes made with spackle—a versatile material that can transform into remarkably realistic confections.
Whether you're a crafting enthusiast, a party planner, or just someone who loves a good DIY challenge, making fake cakes with spackle can be a fun project for all ages.
Starting out with fake cakes
The first time I saw a fake cake was at my cousin's wedding. I had no idea that the expensive three-tiered cake was a dummy wedding cake! That gave me the idea to make a faux birthday cake rather than a faux wedding cake.
Once I made my first one, I was hooked and I brought the project to my classes and allowed them to be their cake decorators. Making dummy cakes is fun, and creative and I love that kids can make their faux beautiful cake to keep forever.
This is a great option for beginner cake decorators or moms like me who just want to trick their teenagers. Or...if you want to do a birthday photo shoot and are worried about a large cake and the mess it brings, a fake one works wonders!
Materials needed to make a realistic fake cake
Before you begin, gather the following materials:
Spackle: Choose a lightweight, paintable spackle. It's typically available at hardware stores and comes in tubs or tubes. I like the ones in tubs because they last longer and you get more bang for the buck.
Styrofoam cake forms or sponges: I love the styrofoam rounds you can find either in cake supply stores or online. These provide the structure for your fake cakes. You can find them in various shapes and sizes at craft stores. We also experimented with making cupcakes and used round sponges from the dollar store. You can also use those cardboard rounds as cake rounds if you do not have access to dummy cakes or sponges. I've also seen artists use round hat boxes which I think are a great option!
Table covering: To protect your hands and surfaces from the spackle.
Piping bags and tips: Used the same way as when decorating a traditional cake
Wax Pencil (optional): Can be used for applying elements such as flowers, fruit or sprinkles. While these are totally optional, my students love using this so that their hands do not get too messy.
Palette knife or spatula: For applying and shaping the spackle. Personally, I love these silicone ones because they are easy to clean.
Sandpaper: To smooth out any rough edges after the spackle dries.
Acrylic paints: For adding color and decoration to your cakes.
Disposable or non-food-safe bowls
Fake Cake Decor: Decorative items like faux fruit, sprinkles, or other embellishments for extra realism. The kids in my classes love these fake cherries!
Decoden cream (optional): Another alternative to using messy piping bags is to use decoden cream. So easy for kids to use! Sometimes this is known as cream clay. Michaels has this cream clay and it worked perfectly in my classes.
Sponges, boxes or tins: These are all different ways you can make fake cakes. You can turn them into boxes, wall art or sculptures! Typically in my older classes I give the kids a choice!
What is spackle?
Spackle, traditionally used for patching holes in walls, has become a surprising favorite among crafters for its ability to mimic the texture and appearance of cake icing. It's a lightweight, easy-to-use material that dries to a hard finish, making it ideal for creating decorative objects that look good enough to eat. You can make the (fake) cake of your dreams with this stuff!
You can buy a small tub at the Dollar Tree or a giant one at the hardware store. In my experience, the Dollar Tree version did not work as well and the tub of spackle from Lowes was worth the additional charge. I picked up a tub and headed to the craft store for the other ingredients.
How to Make an Artificial Cake: A Step-by-Step Guide to Realistic Fake Cakes
1. Prepare your work area
Cover your workspace with newspaper or a plastic sheet to protect it from spackle and paint. Both spackle and acrylic paint can be easily wiped clean before they're dry but become more permanent after.
2. Prepare a cake form
You have many choices when it comes to the cake form. You can use an actual styrofoam cake form (also known as a dummy cake or dummy tiers), which is readily available online. In my classes I have used a variety of materials including sponges, hat boxes, jewelry boxes and tins.
There are other ways you can make a cake form including a cardboard hat box (in which you can make this into a storage box that is camouflaged as a cake). The possibilities are truly endless.
If you are going for a different look, you can use a sponge. With a sponge, you can make either a slice of cake or cupcakes. If cupcakes are the choice you make, you will also want to pick up some cupcake liners. Once you've got your form, no further prep is needed.
3. Prepare the "frosting"

Apply the spackle frosting to your cake form
Using a palette knife or spatula, take about a cup of spackle from the bucket and put it into a bowl. Add some brown paint (acrylic) if you want to make your cake a chocolate cake. If you want other colors, add those instead.
Mix well for a consistent color or gently swirl for a mixed/marbled appearance.
Spread the spackle evenly over the entire surface of the imitation tiers.

Spread the spackle frosting evenly over your cake form
Apply it in a thickness that mimics the icing on a real cake. You can create smooth or textured finishes depending on the effect you want. To mimic the texture of icing, use the edge of your spatula to create swirls or peaks in the spackle before it dries. This step adds realism and character to your fake cake.
4. Add designs and "toppings"

Use a piping bag to add designs
Grab a piping bag and place it inside a sturdy cup or a mug. In my experience, an empty Pringles can work great for this process.
Cut off the tip of your piping bag and add the desired tip. Begin spooning in your spackle mixture. Add the coupler and screw it on tightly.
Begin adding flowers or swirls in the same way you would apply decoration to a frosted cake. You can go online and watch a YouTube video to learn new techniques. It might be a good idea to look at wedding cake design videos for inspiration.
If your decoration looks like a hot mess, simply grab your spackling knife remove it while the spackle mixture is still wet, and put it back inside the bag. Easy peasy! This makes it easy to try out different looks and design ideas without worrying that you ruined the rest of the cake.
Once you are happy with the outcome of your cake, you can add elements like fruit, pearls, sprinkles, or really anything that strikes your fancy!
For smaller objects like pearls, if you want them to have a uniform appearance, applying them with a wax pencil will make life much easier. Trust me! Especially when you are working with kids.
Once you are done, feel free to add a cherry to the top of the cake.
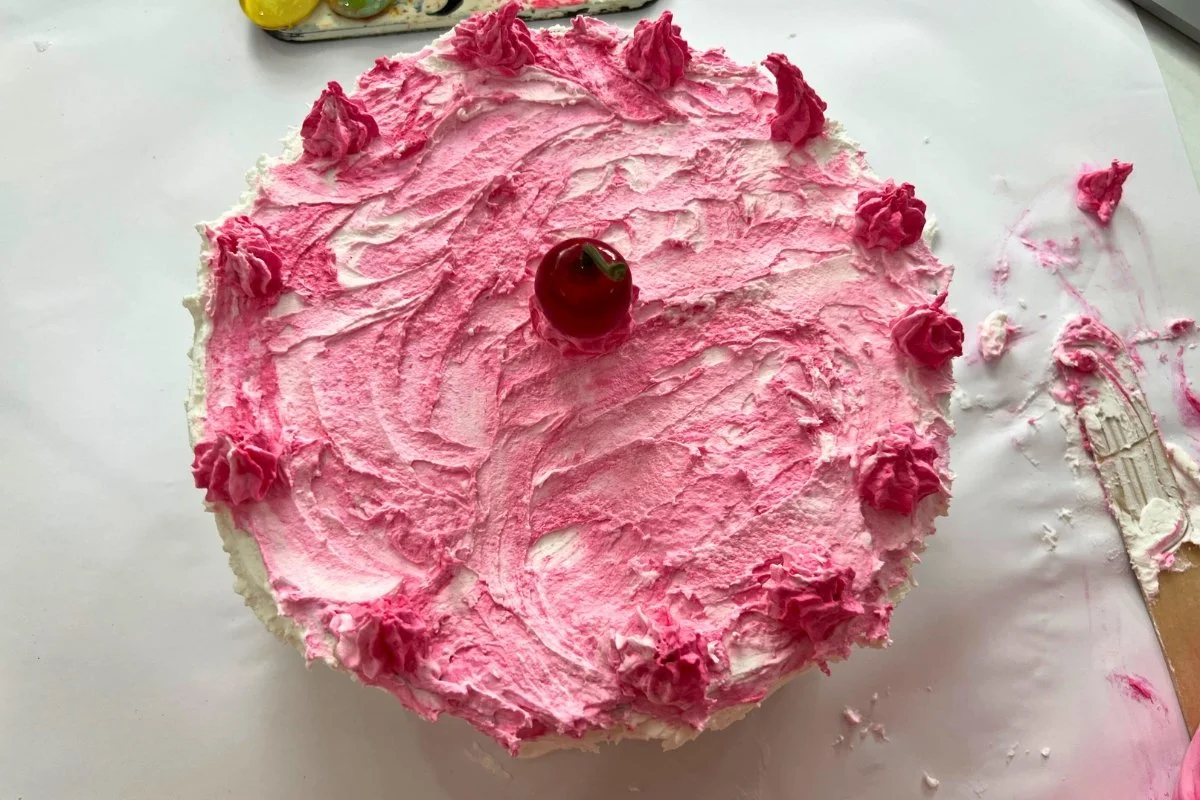
Don’t forget the cherry on top!
5. Let It Dry
Allow the spackle to dry completely according to the manufacturer's instructions. This usually takes a few hours, depending on the thickness of your spackle layer.

Let the spackle dry completely
Once your cake is dry, you can use it as home decor or as an April Fool's Day trick. You can also make another and add a top tier. The creativity possibilities are endless!
Tips for Success
Practice Patience: Let each layer of spackle dry thoroughly before applying the next. In my experience, the spackle must be dry before adding florets or designs using the piping tips.
Experiment with Textures: Try different techniques with your palette knife to achieve various icing textures. When I did this with my classes, I had the kids practice first on scrap styrofoam to get a feel for the material.
Personalize Your Design: Get creative with colors and decorations to match a specific theme or occasion. If you end up wanting to write a name in icing, I love the Tulip slick paints because they give full coverage, are easy to apply and dry with a slick, icing-like appearance.
Handle with Care: While sturdy, fake cakes made with spackle are not edible and should be handled gently to avoid damage. Spackle cakes will also never feel completely hard; they have a softer, spongier feel than grout or glue. The finished cake will feel somewhat like stale bread.
Conclusion
Creating fake cakes with spackle is a fun and rewarding craft project and a great way to showcase your creativity without the stress of baking. Whether you're making a display piece for a party, a photo shoot, or simply for the joy of crafting, spackle offers a versatile medium that can turn ordinary materials into extraordinary creations.
So, gather your supplies, unleash your imagination, and enjoy the satisfaction of making something beautiful—and completely calorie-free!
Whether you're a seasoned crafter or a novice looking for a new hobby, making fake cakes with spackle is a delightful way to indulge in the art of confectionery without the calories.
This project is great for a big day and works well for even the most inexperienced diy-er. So, mix up some spackle, shape your cake, and let your creativity shine!
If you liked this project, try making a DIY Fruit Loops Candle!