
11 Cute Shrinky Dink Earring Ideas for DIY Jewelry Making

11 Cute Shrinky Dink Earring Ideas for DIY Jewelry Making
Do you remember making Shrinky Dinks as a kid? They've been a beloved craft for decades because you can do so many crafts with Shrinky Dink sheets!
If you're looking for a fun, easy, and customizable way to make your own jewelry, Shrinky Dink earrings are the perfect project. In this guide, we'll walk you through the basic steps to make DIY earrings and provide a list of 11 fun Shrinky Dink earring ideas to get your creative juices flowing.
What Are Shrinky Dinks?
Shrinky Dinks are thin sheets of plastic that, when heated, shrink to about a third of their original size while becoming thicker and more durable. This makes them an ideal material for crafting items like keychains, magnets, and, of course, earrings. With the right tools and a bit of creativity, you can create stunning, one-of-a-kind plastic earrings that showcase your personal style.
Can You Make Earrings Out of Shrinky Dinks?
Shrinky Dink paper is perfect for creating lightweight, customizable earrings. The basic steps involve designing your shapes, cutting them out, and baking them until they shrink to a durable size. After cooling, you can attach earring hooks using jump rings to complete your design.
Basic Steps to Make Shrinky Dink Earrings
You can make Shrinky Dink earrings in a few easy steps with some basic materials. Here's a step-by-step guide to get you started:
Materials You'll Need to Make Your Own Shrinky Dink Earrings:
Shrinky Dink plastic sheets: Shrinky Dink products can be found at most craft stores or online. Look for both clear and frosted options.
Permanent markers: Ideal for drawing your designs, as they don't smudge or fade after baking.
Colored pencils: Use on the rough side of the plastic for softer, lighter colors.
Paint markers: Perfect for adding bright, bold colors to your designs.
Acrylic paint: Use this for more intricate details or to cover larger areas of your design.
Parchment paper: Protects your baking sheet and prevents your plastic from sticking.
Cookie sheet: A flat surface for baking your designs.
Hole puncher: To create holes for the earring hooks before baking.
Earring hooks: These will be attached to your Shrinky Dink shapes to create earrings.
Jump rings: Small rings that connect your Shrinky Dink piece to the earring hook.
Needle nose pliers: Useful for opening and closing jump rings.
Step 1: Create Your Design
Start by drawing or tracing your design onto the rough side of the sheet of shrink plastic. You can use permanent markers for bold lines and colored pencils for softer colors. Don't forget to leave plenty of space for cutting and hole-punching later. If you're not confident in your drawing skills, you can use printable shrinky dinks with pre-made designs or do an image search for inspiration.
Step 2: Cut and Punch Holes
Carefully cut out your design, leaving a small white edge around the outline if you like that look. Use the hole puncher to create a hole where you'll attach the earring hook. Ensure the hole is large enough, as it will shrink during baking.
Step 3: Bake the Shrinky Dinks
Preheat your oven to 325°F and line a cookie sheet with parchment paper. Place your Shrinky Dink designs on the baking tray, ensuring they have plenty of room to shrink. Bake them for 2-3 minutes, watching through the oven light as they curl up, shrink, and then flatten out again. Once they've flattened out, leave them in for another 30 seconds to ensure they are fully baked. The final product should be about a third of its original size and much thicker.
Step 4: Assemble the Earrings
Once your Shrinky Dinks have cooled, it's time to turn them into earrings. Use needle nose pliers to attach a jump ring to the hole in your Shrinky Dink, then add an earring hook. Close the jump ring securely, and your earring is complete!
Gluing on earring backs would work too.
11 Shrinky Dink Earring Ideas for Inspiration
Now that you know the basic steps to make Shrinky Dink earrings, here are 11 creative ideas to inspire your next project:
1. Terrazzo Shrinky Dink Earrings from Silhouette 101
Create a modern look with colorful terrazzo patterns. Use acrylic paint to mimic the speckled look of terrazzo tiles

Photo Credit via Terrazzo Shrinky Dink Earrings
2. Rainbow Shrinky Dink Earrings from Made with Happy
Create these cute rainbow earrings with paint or use a rainbow template. Perfect for adding a splash of color to any outfit.

Photo Credit via Rainbow Shrinky Dink Earrings
3. Skeleton Shrinky Dink Earrings from Lia Griffith
Perfect for Halloween, these spooky skeleton earrings are a fun part of any costume.

Photo Credit via Skeleton Shrinky Dink Earrings
4. Retro Shrinky Dink Earrings from J and J Design Company
Take inspiration from the 80s with bold shapes and fun colors. This retro craft idea is sure to stand out.

Photo Credit via Retro Shrinky Dink Earrings
5. Alcohol Ink Shrinky Dink Earrings from Persia Lou
Experiment with different color combinations using alcohol inks to make statement earrings.

Photo Credit via Alcohol Ink Shrinky Dink Earrings
6. Holographic Shrinky Dink Earrings from Happiness is Homemade
Use holographic vinyl for a futuristic twist. This jewelry catches the light in all the right ways.

Photo Credit via Holographic Shrinky Dink Earrings
7. Cactus Shrinky Dink Earrings from Crazy DIY Mom
Embrace the succulent trend with cute cactus designs. Try out different designs for a unique look!

Photo Credit via Cactus Shrinky Dink Earrings
8. Halloween Shrinky Dink Earrings from Resin Obsession
You can make ghosts, pumpkins, or even bats for some spooky jewelry. The possibilities are endless for creating Halloween graphics on your earrings.

Photo Credit via Halloween Shrinky Dink Earrings
9. Flower Shrinky Dink Earrings from Silhouette 101
Make floral earrings in any flower shape you like. These would be a perfect gift for Mother's Day!

Photo Credit via Flower Shrinky Dink Earrings
10. Patriotic Shrinky Dink Earrings from Gina Creates
Show off your patriotic spirit with red, white, and blue Bomb Pop earrings. Perfect for the Fourth of July, or any time you want to show some love for your country.
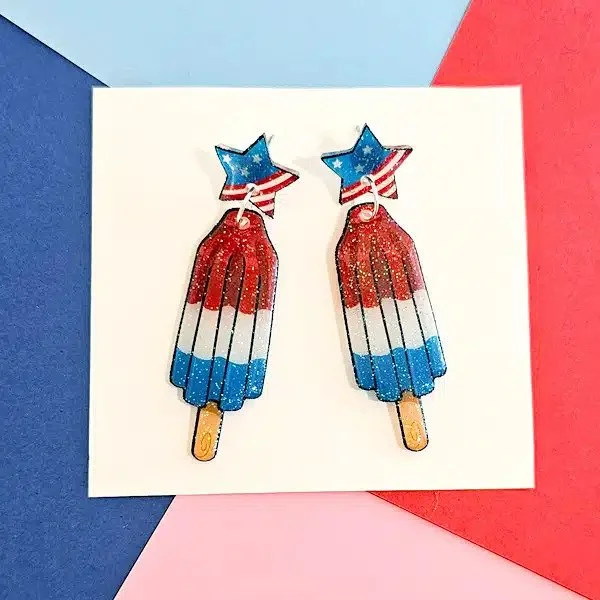
Photo Credit via Patriotic Shrinky Dink Earrings
11. Smartest Pumpkins in the Patch
You can't go wrong with a classic pumpkin patch door with the names of your students. Plus, this one can stay up even after Halloween is over!

Photo Credit via Smartest Pumpkins in the Patch
Tips for the Best Results
The plastic shrinks as it heats, so make your designs larger than you want the final product to be.
Use a heat gun to flatten any pieces that come out slightly curved.
Test a lot of coloring methods on a separate flat sheet of plastic before committing to your final design.
If using acrylic paint, apply thin layers for even coverage and the best results.
Avoid holding a naked flame near your Shrinky Dink to prevent damage. Instead, opt for safe heating methods like an oven or toaster oven.
Parchment paper will keep your designs from sticking to the baking sheet during the shrinking process.
What Other Shrinky Dink Projects Can You Make?
Shrinky Dinks aren't just for earrings; they're incredibly versatile for various plastic crafts. You can create Shrinky Dink magnets with free cool designs or even make stylish napkin rings for a unique table setting. For the holidays, making Shrinky Dink projects with your kids like a Christmas tree ornament is so much fun .
Personalized items like a DIY flower blossom ring or Shrinky Dink keychains can be sold on your Etsy shop. You can even print your own designs on the smooth plastic sheets using an inkjet printer. There are endless Shrinky Dink craft ideas!
FAQs About Shrinky Dink Earrings
What size should you make Shrinky Dink earrings?
When designing Shrinky Dink earrings, remember that plastic shrinks to about a third of its original size during baking. To determine the final size, multiply your desired final size by three. For example, if you want 1-inch earrings, make your design 3 inches tall.
What size hole punch should you use for Shrinky Dink earrings?
A standard hole puncher that makes a 1/8-inch hole is perfect for Shrinky Dink earrings. The holes will shrink during baking, so this size ensures they remain large enough to accommodate jump rings and earring hooks.
Can you use alcohol markers on shrink plastic?
Yes, you can use alcohol markers on shrink plastic. However, for best results, make sure to use them on the rough side of the Shrinky Dink sheet. This helps the ink adhere better and prevents smudging. Keep in mind that colors may darken during the shrinking process.
What can you seal my Shrinky Dinks with?
You can seal your Shrinky Dinks with a clear acrylic paint sealer, a gloss varnish, or resin to give them a shiny finish and protect the colors. Sealing is especially useful if you used colored pencils or paint markers on your designs.
What can you not use on Shrinky Dinks?
Avoid using oil-based markers, water-based paints, or anything that doesn't adhere well to smooth plastic surfaces on your Shrinky Dinks. These materials may not bond properly with the shrink film and could peel or smudge during the baking process.
Can you drill a hole in Shrinky Dinks?
Yes, you can drill a hole in Shrinky Dinks, but it's best to do this after the whole process of baking is complete. Use a small drill bit to carefully create a hole if you forgot to punch one before baking. Needle nose pliers or a round nose pliers can be used to hold the piece steady while drilling.
How do you punch holes in Shrinky Dinks without a hole punch?
If you don’t have a hole puncher, you can use a sharp object like a needle or a pin to carefully create a hole before baking. Be sure to leave plenty of space around the hole to prevent tearing. After heating, the hole will shrink but remain functional for attaching earring backs.
How do you get perfect Shrinky Dinks?
To get perfect Shrinky Dinks, follow the heating instructions closely, use a baking tray lined with parchment paper, and ensure your oven is preheated to the correct temperature. Watch them through the oven light as they shrink to avoid over-baking. For a smooth finish, flatten them with a baking sheet right after they’ve shrunk.
Happy Crafting!
Shrinky Dink earrings are a fun craft that lets you express your creativity in a wearable form. Whether you're making them for yourself, as gifts, or to sell at craft fairs, these plastic earrings are sure to be a hit. With so many shrinky dink ideas out there, the possibilities are endless. So grab your shrink film, gather your supplies, and start crafting your own shrink dink earrings today!
If you loved making Shrinky Dink earrings, don't forget to make your mom a Shrinky Dink keychain for Mother's Day!