
30 Cool Tie Dye Patterns & Folding Techniques You’ll Want to Try
So you want to learn how to create unique tie dye patterns? Tie-dyeing is more than just a fun activity; it's a creative way to express yourself through vibrant colors and unique designs on fabric.
Whether you're looking to make a tie-dye shirt for yourself or as a gift, mastering different tie dye patterns and folding techniques can turn a plain white t-shirt into a work of art with bright colors.
This post explores 30 cool and easy Unique tie dye patterns and folding techniques, perfect for anyone wanting to dive into the world of tie-dye.
What You Need for Your Unique Tie Dye Patterns Project
Materials and supplies:
Tie Dye Kit: this is the only kit I would recommend if you do not want to buy items a la carte
Soda ash: you want to make sure you have soda ash on hand so that your colors do not fade. You want to make a mixture of soda ash and warm water and soak for 20 mins.
Cotton t-shirts: cotton works best. If you can’t find cotton, try a blend with a high percentage of cotton
Detergent: You will want to use this specialty detergent both before and after tie dying
Dye - I only use the professional dyes because they yield the best results!
Washable markers: This is a great way to draw guidelines when folding
Needle tip precision squeeze bottles (optional, but great for detail)
Grate (good for letting the dye drop down without the fabric sitting in dye
You can purchase these items separately or look for a tie-dye kit at your local craft store or on Amazon.
I love ordering supplies on Amazon because there are tons of selection results, free shipping (typically ships within a few business days) and it’s never a final sale so if you change your mind, you can send the supplies back.
Check out my favorite items on my Amazon storefront. You’ll find a full page of all of my favorite things!
Affiliate disclaimer: Although I stand by all of the products I use, I can receive a small commission from any products purchased via my affiliate links.
The Basics of Tie Dye Projects
What types of items are best to tie dye?
For best results, you want to use a fabric item that's made of natural fibers. 100% cotton shirts are the best, but it's okay to have a bit of a blend as long as it's at least 50% cotton.
If you get more than 50% synthetic material, the dye won't hold as well. I prefer to wear a plain white T-shirt, but you can tie dye any color of material. You won't get vibrant results on a dark-colored item like you do on white.
You can also tie dye tote bags, old clothes, or really any natural material cloth items.
Where can I find items to tie dye?
The best place to find 100% cotton shirts and other dyeable clothes is at craft stores like Michaels. Amazon and Walmart are also great places to find a cotton shirt for your tie-dye projects.
What types of tie-dye can I use?
When it comes to tie-dyeing, there are several types of dyes to choose from, each with its own unique characteristics. Traditional tie-dye involves using fabric dye and tying the garment with rubber bands or string to create intricate patterns. For beginners, Tulip brand tie dye works well. However, for colors that last, consider switching to Dharma (my personal favorite dye brand). Jacquard would be a better choice, too!
Cold-water dye is another popular option, which can be applied directly to the fabric without the need for a heat setting.
On the other hand, hot-water dye requires heat to set the colors and is typically used with a washing machine or stovetop method. Ice tie dye is a newer technique that involves applying powdered dye onto ice cubes placed on the fabric.
When the ice melts, the result is a watercolor-like effect. The main difference between these types of dye lies in their application method and the intensity of colors produced. If you're using a tie dye kit, you will most likely be using traditional dye.
How to Tie Dye Like a Pro
Step 1: Prep the Fabric
While there are many unique tie dye patterns, many steps of the tie dye process are the same regardless of the design you choose. Follow these best practices when creating any tie-dye project for the best results.
For the best possible results, pre-wash your garments. (Clothing often arrives with a treatment or a resist which will prevent the dye from soaking in). Washing your clothing before using the dye will allow the dye to better absorb. Clothing also sometimes has oils from factory spraying.
Soaking the garments (do not skip this step)!!
Wearing gloves, mix one cup of soda ash with a gallon of warm water. Shake or mix vigorously to dissolve the powder. If you wait too long to mix, soda ash will harden.
Do not skip this step! Soda ash is one of the magic ingredients for vibrant garments. Soak the garments in the soda ash for 20-30 minutes.
Helpful hint: Soda ash is the same as washing soda (it is NOT baking soda). Soda ash can be an eye irritant, so gloves, a mask, and protective eyewear are recommended.
Soda ash is an activator & as soon as the soda ash mixes, it activates and should be used within 24 hours. We do not combine soda ash with our dye because we want you to have more time to work on projects.
Place garments either in the sun to dry until damp or in the spin cycle of your washing machine. Do not put clothing in the dryer—this will affect how the dye works.
Dry clothing until it is damp, but not wet. If you try to tie dye a dry sweatshirt, the folds will not stay together and the dye rolls off the fabric instead of soaking in.
Step 2: Fold & Tie the Fabric
Begin folding your garment according to your favorite folding technique. See different ways you can fold to make different designs below. Use rubber bands around the garment to hold your folds together.
If rubber bands are too hard to use, consider tying the clothing with string. Rubber bands are great for most garments, but string can be easier on larger garments.
Step 3: Apply the Dye
Place the dye powder in each squirt bottle. Add warm water to each squirt bottle to activate the dye. Fill each bottle to the top and shake vigorously with the cap on.
You will know the bottle is mixed when the dry powder is no longer sitting at the bottom of the bottle. Before you start dyeing, it's a good idea to prepare your work surface with a plastic tarp, trash bag, or floor covering.
Apply the liquid dye closely to the garment. Do not use too much dye because excess dye can saturate the fabric and can cause the tie-dye design to get lost. Use enough dye to completely cover the white space.
Step 4: Rinse & Wash
After the dye is applied, keep the rubber bands on and place items in a sealable plastic bag or wrap tightly in plastic wrap for 24 hours. This is where the magic happens.
Wash your garment. Remove it from the bag and leave the rubber bands on. Rinse under cold running water to stop the dye reaction.
Next, rinse in warm water and remove the rubber bands. Keep rinsing until the water runs fairly clear. Ring out your sweatshirt and place it in a washing machine.
Using a washing machine, run it through a full cold water cycle without detergent. You can wash up to 8 garments together in one load. When washing, keep similar colors together.
Wash a second time on the cold water cycle of your washing machine using a small squirt of dish soap like Joy or Dawn. Do NOT use regular laundry detergent on this cycle. You can put it in the dryer after this cycle is complete.
Your garment is ready to wear or use! You can use regular detergent and place it in the dryer the next time you wash tie-dyed garments.
Dye may continue to run so we recommend washing separately for the first few washes and avoiding hot water just to be safe.

Easy & Beginner Tie Dye Patterns
1. Spiral Tie Dye Pattern from Art Beat Box
When you think tie-dye, this classic spiral pattern probably comes to mind. The spiral tie-dye technique is made by twisting a shirt from the center point and is a great place for beginners at tie dyeing to start with.
2. Crumple Tie Dye from Pineapple Paper Co.
The crumple pattern is the easiest tie dye pattern. This crumple technique is great for beginners because you really can't go wrong. Use a single color for a simple look or different colors for more vibrant results with the crumple tie-dye pattern!
3. Stripe Tie Dye from Art Beat Box
Stripe tie dye designs are so much fun! You can make horizontal stripes or vertical stripes using an accordion fold in a straight line.
4. Bullseye Tie Dye from The Neon Tea Party
The bullseye tie dye pattern looks complicated when you see the finished product, but it's actually pretty simple! Just make sure you have plenty of elastic bands and dye colors for this one.

5. Heart Tie Dye from Art Beat Box
The heart tie-dye pattern is on of our favorite tie-dye patterns, and makes a great shirt for Valentine's Day. You'll also need a washable marker to dry a heart template in the middle of the shirt for this method!
6. Sunburst Tie Dye from Tie Dye and Teal
What a great way to celebrate summer - by transforming a plain white t-shirt into a masterpiece with vibrant colors in a sunburst pattern!
7. Chevron Tie Dye from Tie Dye and Teal
Chevron pattern is very popular, so why not transform some old t-shirts with V-shaped tie dye lines? This cool tie dye technique is an easy way to keep yourself entertained this summer!
8. Ombre Tie Dye from Oh Yay Studio
Ombre tie dye is a fun activity for beginners because it involves less folding than other methods.

Cool Tie Dye Patterns
9. Scrunch Tie Dye from The Neon Tea Party
The scrunch tie dye pattern is a lot like the crumple pattern with rubber bands added. This is a great activity if you are tie dying for the first time since it doesn't rely on precise folds. I love the end product!
10. Reverse Tie Dye from Chaotically Yours
Reverse tie dye is a huge trend right now. This technique involves using bleach on a black shirt instead of a white shirt. You can use just bleach or add dye colors to make vibrant tie dye designs. How cool is the result?!
11. Zigzag Tie Dye from Up and Dyed
The zigzag tie dye pattern is so fun!
12. Diagonal Stripe Tie Dye from Rit Dye
We have horizontal and vertical, but we can't forget about diagonal stripes!

Advanced Tie Dye Folding Techniques
13. Star Tie Dye from Tie Dye Your Summer
The star tie dye technique would make a perfect 4th of July shirt!
14. Swirl Tie Dye from Riah’s Tie Dye
This particular design is also known as a super-spiral! (You can see why)
15. Polka Dot Tie Dye from Gathered
The polka dot tie dye technique doesn't require a lot of folding, so it's a fun way for beginners to make a tie-dye shirt!
16. Target Tie Dye from Melanie Brumer
Similar to the bullseye design, the target tie dye technique makes a circular shape pattern.

17. Diamond Tie Dye from Tie Dye Your Summer
The diamond tie dye technique is so cool! I love the mirrored effect.
Don't have rubber bands? No problem! This technique uses just folds to create a cool square effect.
19. Concentric Circles from Bella Donna Dyes Co
This tie dye design is so cool, but the folding and tying technique is a little more advanced.
20. Ice Tie Dye from Bre Pea
The ice tie dye method creates a similar effect to the crumple design using ice. This is such a fun way to tie dye during the summer!

Trending & Unique Tie Dye Patterns
21. Kaleidoscope Tie Dye from Tie Dye Your Summer
This fun pattern is made using the ice tie-dye technique. Doesn't it remind you of looking through a kaleidoscope as a kid?
22. Rainbow Arch Tie Dye from The Neon Tea Party
If you love the rainbow color pattern, this easy rainbow arch tie dye tutorial is for you!
23. Yin Yang Tie Dye from Tie Dye Your Summer
Add a little peace and harmony to your wardrobe with this yin yang tie dye design.
24. Glitch Tie Dye Bella Donna Dyes Co
I had to do a double take that this pattern was tie dye.. it looks like a real computer glitch pattern!

25. Glue Resist Tie Dye from Crafty Chica
Glue resist tie dye is an easy way to add patterns to your tie dye design.
26. Galaxy Tie Dye from LSD Tie Dye TV
This is another one that I can't believe is a tie-dye project. The galaxy design is stunning!
27. Star Mandala Tie Dye from Chandye
If you're ready for some more advanced folds, try out this star mandala pattern!
28. Watermelon Tie Dye from Dharma Trading Co
How fun is this watermelon tie dye pattern for summer? Pretty easy too!
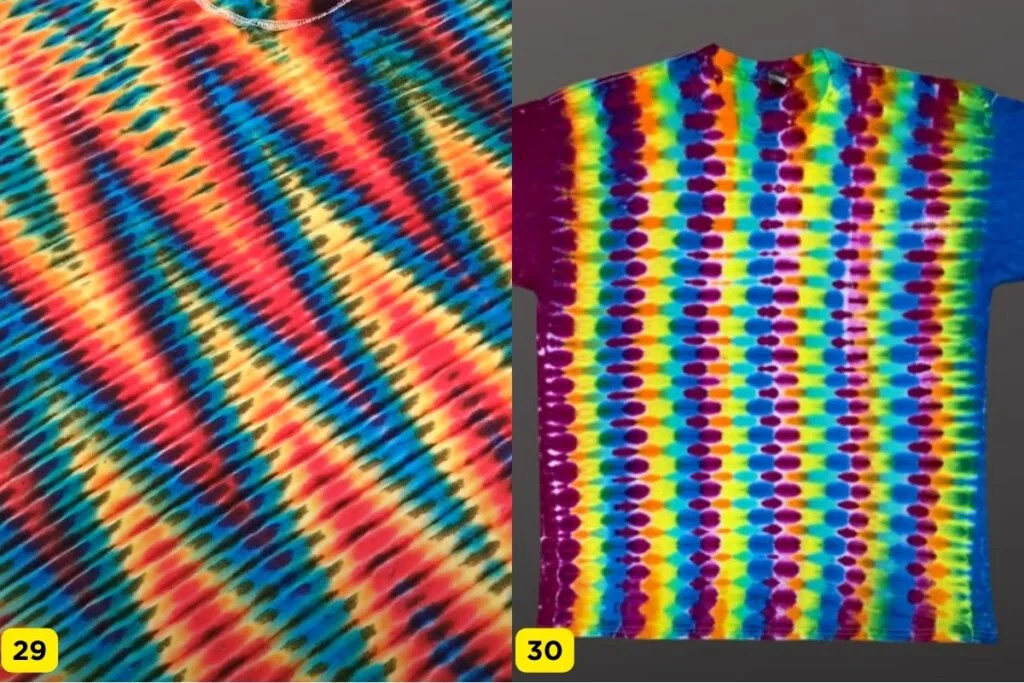
29. Wig Wag Tie Dye from Chandye
The wig wag pattern is exactly what it sounds like.. a wiggly zig zag!
30. Honeycomb Pattern from Riah's Tie Dye
Frequently Asked Questions (FAQs)
1. What are the easiest tie dye patterns for beginners?
The crumple, spiral, and stripe folds are easiest — they require minimal precision and produce reliably great results!
2. What are some advanced tie dye patterns?
Galaxy, mandala, concentric circles, and reverse bleach dye are considered advanced. They require precise folds and careful color placement.
3. How do I create a wedge shape in my tie-dye pattern?
To create a wedge shape, lay your damp t-shirt flat on a surface and fold it from the central point to the outer edge like a pizza slice. Secure the folds and place rubber bands along the length to maintain the wedge shapes, then apply your dye along these sections for distinct, vibrant effects.
4. What's the best way to ensure bright colors in tie-dye?
For the brightest colors, use a pre-washed t-shirt that's still damp. Avoid using fabric softener in your pre-wash as it can coat the fabric and prevent the dye from absorbing properly. Apply tulip one-step dye directly to the white areas to maximize color saturation.
5. Can I use natural dyes for tie-dye?
Yes, natural dyes can be used for a more organic tie-dye experience. Prepare your fabric by soaking it in a mordant to fix the dye, and then apply the natural dyes. Remember, natural dyes often result in more muted colors compared to synthetic dyes.
6. What is the best technique for folding fabric for vertical stripes?
For vertical stripes, fold your fabric accordion-style along the length of the item. Place rubber bands at even intervals or vary them for different stripe thicknesses. Apply the dye in alternating colors between the rubber bands for a striking pattern.
7. Which tie dye styles are trending now?
Galaxy, pastel swirls, and earth-tone tie dye are especially popular in 2025.
There's seriously no limit to the tie-dye creations you can make with this list of 20 unique tie dye patterns and folding techniques. I hope you get great results with any technique you choose!
The best part about this creative activity is that any technique can make cool designs.
Happy crafting!
Looking for more tie-dye projects? Click here to learn how to tie dye with Sharpie!
Curious which dye is best for your next tie dye project? Click here for our recommendations!