
How to Make a DIY Tufted Rug

How to Make a DIY Tufted Rug
Diving into a DIY rug project is a fabulous way to spruce up your home decor. There are so many different types of step by step DIY rug tutorials out there, it can be hard to decide which type of rug to make.
Are you trying to get rid of old clothes like old t-shirts? Do you have a sewing machine? Are you up for learning a brand new weaving process or is something like a braided rug more your speed?
All of these factors will impact which type of rug you choose for your DIY rug project. In this post, I'm sharing how to make a step by step DIY rug using the tufting method.
Never heard of tufting? Keep reading to learn more!
Why Rug Tufting?
In recent years I've been watching lots of rug makers on social media. I've been thinking about taking a rug tufting class forever and I never really got around to doing it and decided to figure it out on my own. I've since been obsessed with the creative process.
I absolutely love this art form and can't wait to show you how to make your own rug! Rug tufting is such a uniquely creative art form and its a great way to make art that's also functional.
There are two ways to make a handmade rug with tufting: using a tufting gun or using a punch needle tool. I have worked with both tools and while I love the punch needle, it takes a long time to cover the entire surface. The two rug making processes are quite different, so for this article I will be focusing on the rug tufting process using a tufting gun.
Understanding the Tufting Gun
Before diving into the process, it’s crucial to understand what a tufting gun is and how it works. A tufting gun is an electric tool used to punch yarn through a backing fabric to create a pile. There are generally two types of tufting guns: cut pile and loop pile. Cut pile guns trim the yarn loops to create a plush, velvety surface, while loop pile guns leave the yarn in loops for a more textured finish. For this tutorial, I will be using a cut pile rug because I like that it trims the yarn as you go. If you're interested in a loop pile gun, there are plenty of youtube tutorials available online.
Cut Pile Gun: If using a cut pile gun, the yarn will be trimmed as you tuft, creating a plush surface. Be mindful of the depth and density of the pile.
Loop Pile Gun: With a loop pile gun, the yarn remains in loops, creating a different texture. Ensure that the loops are evenly spaced and consistent in height.
Gather Your Materials
To start tufting your rug, you’ll need:
Rug Tufting Gun: Ensure it’s suitable for the type of rug you want to make.
Backing Fabric: Typically tufting cloth is a mesh or primary backing fabric that can handle the tufting process. I have tested monk cloth and burlap and I prefer burlap.
Yarn: Choose high-quality yarns in your desired colors and textures.
Frame: A sturdy frame or a large embroidery hoop to stretch and secure your backing fabric.
Adhesive: For the final step, to secure the yarn and provide durability. There are three main adhesives that people use:
Roberts: this is readily available at hardware stores and is low odor. It dries flexibly and never really loses its tack. It is intended as a way to adhere carpets and rugs to a substrate material.
Elmer's: Elmer's works great and is good for beginners. It is durable but you can't really wash your rug since Elmer's is washable.
BOND AAT1132: This is only available online and is the most durable and washable adhesive. Think industrial strength!
Thick putty knife: (3 inches or more)
Tool Accessories: Such as scissors, a tufting frame, and any other tools needed for setup and finishing
Dustpan and broom
nitrile gloves
Vacuum - this one has been a workhorse for me!
Projector - my friend uses these to project designs onto cookies and I absolutely love it! You can even watch it to project films and pictures onto a wall.
Yarn winder - this was a total game changer for me!
tweezers
spray adhesive - make sure to use contact adhesive
screwdriver
Tweezers
Tufting kit - I am obsessed with this one because it literally comes with everything you’ll need to get started!
Frame kit - so much easier than building one from scratch!
Bandaids - the edges of the carpet grippers are super sharp. I need bandaids pretty regularly!
Prepare Your Workspace
Set up your workspace in a well-lit and comfortable area. Just know that rug tufting can be messy. Essentially, the rug tufting gun spits out cut yarn and you will need to sweep and/or vacuum quite regularly.
Ensure that you have enough room to maneuver the tufting gun and manage your backing fabric. It’s helpful to work on a table or a surface that allows you to easily stretch and manipulate the fabric.
You'll also need space because you will be working on both the front and the back of your rug during this process.
Design Your Rug
Sketch out your rug design on paper or look online for images you would like to use. This will serve as your blueprint when tufting. You can use a template or stencil for more intricate designs, but I prefer to use a projector for maximum accuracy.
Use a sharpie to outline the design and don't forget to label each section so that you know what color yarn to use. Use multi-colored sharpies if you want to make it easier for yourself. I usually just use black, but if there are small sections, I sometimes add color.
This outline will guide your tufting gun and help ensure your design is accurately executed.
Pro tip: If you are using words, they will need to be mirrored (backwards). This is because you will be using the tufting gun on the back of the rug and the design will show through on the front of the rug. Once you have the outline of your design complete, you can begin making your tufted rug.

Outline the design of your rug
Wind The Yarn
I highly recommend getting yourself a yarn winder. Yarns come in skeins and they often tangle inside the tufting gun. Winding the skeins into yarn cakes is a total game changer.
You can use either a handheld yarn winder, an electric speed winder or some people simply use a drill. Sometimes I have to wind the yarn twice before having the right tether.
Thread the Tufting Gun
Prepare your tufting gun by threading it with yarn. Follow the manufacturer’s instructions for loading the yarn into the gun.
Generally, this involves placing the yarn on the spool, threading it through the gun’s scissor tips, and ensuring it’s properly positioned for tufting.
Make sure the yarn is smooth and free of tangles. Always make sure the tufting gun in unplugged when loading it. The tip of the tufting gun is essentially electric scissors and it can be dangerous.
Begin Tufting
The whole process of tufting can look intimidating, but it just takes a little practice. Here are step by step instructions for how to tuft your own rug for the first time:
Start tufting by turning on the gun.
Press it all the way into the cloth firmly and then press the trigger.
Carefully guide the tufting gun along your design outline. Hold the tufting gun perpendicular to the backing fabric, and work steadily to punch the yarn through the fabric.
Move the gun in a consistent motion to ensure even coverage and maintain the integrity of your design. If the fabric starts to give a little bit, stretch the cloth along the frame to make it a little bit tighter. It is ok to adjust your table height or even to sit on a stool, chair or the floor if needed.
Once you finish your first color, check out the front and back of your frame and see if any adjustments need to be made. If they do, this is the best time to make changes.
Wind a new color of yarn into the yarn winder and add this yarn to the gun and repeat the steps above. Keep going until you have filled in all of the bald spots.
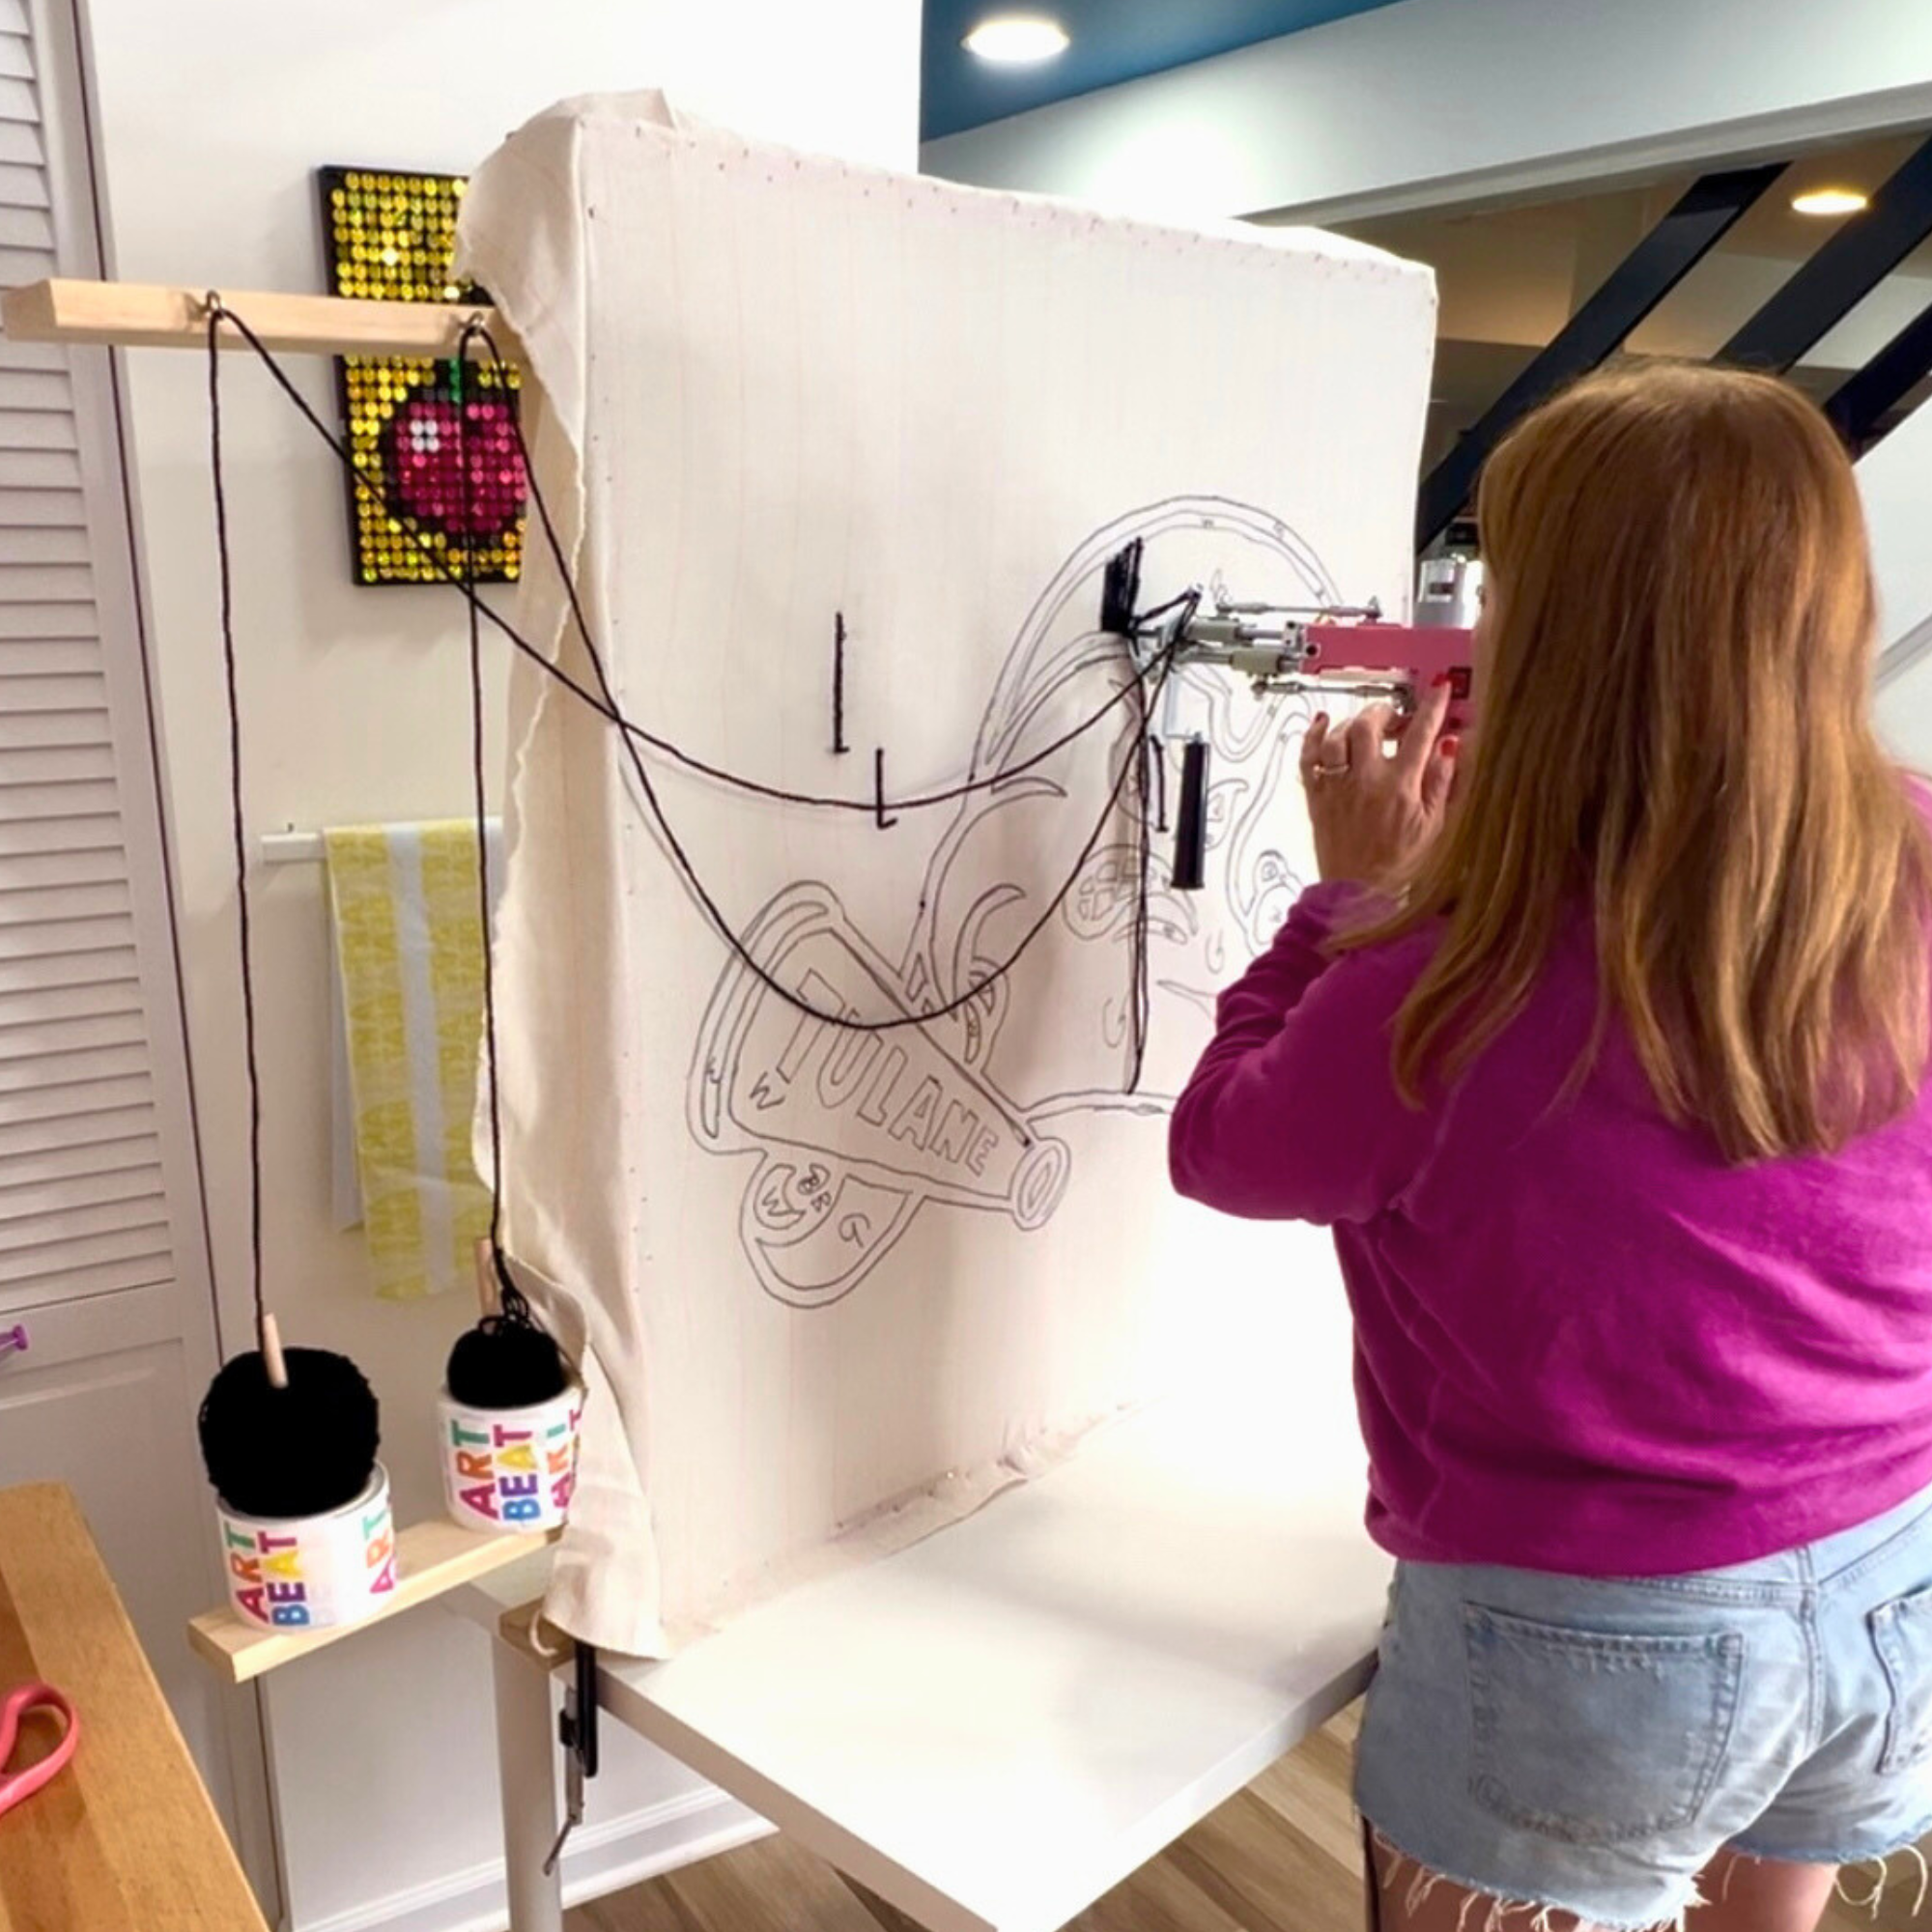
Use the tufting gun to start creating the design of the rug
Adjust as Needed
As you tuft, periodically check your work to ensure the design is coming out as planned. Adjust your technique if necessary to correct any mistakes or to maintain consistent yarn loops.
Take breaks to review your progress and make any needed adjustments. If you do notice that you've made a mistake, you can remove the yarn before the glue is added.
Using tweezers, go in and pull out any mistakes. If you need to add more yarn after you've removed the pieces, you can still do this.

Make adjustments as you go
How to remove the rug from the frame
Using a utility blade or sharp scissors, cut around the rug leaving around 2 inches on all sides. Without the two inches, you will not be able to properly finish the rug.
Do not stack multiple rugs as the glue is still tacky
Gluing the Rug
Once the tufting is complete, it’s time to finish your rug:
Trim Excess Yarn: If using a cut pile gun, trim any excess yarn to achieve a uniform pile height. You will want to make sure that there are no long strands of yarn hanging off of the cloth. This is because these pieces of yarn will add unnecessary bulk to the rug and it will likely be lumpy which isn't good when it comes to rugs! Do not skip this step.
Apply adhesive: To ensure the yarn stays in place and to add durability, apply a layer of latex backing to the underside of the rug. This step is essential for preventing the yarn from coming loose over time. Use a putty knife to apply your adhesive. Use a consistent amount of adhesive on the entire back of your design. This will keep the yarn fibers in place.
Let Dry: Allow the latex backing to dry completely before handling or using the rug. Follow the manufacturer’s instructions for drying times. I typically allow 12 hours for drying.
Finishing the backing of the rug
Backing the fabric is what the rug needs to look finished, but it also will protect the fibers from coming apart. There are many choices when it comes to backing your finished rug, so experiment and see what works best for you! Here are the steps to adding the backing:
Take your finished rug and lay it flat on the floor upside down or on a table.
Next, fold over the 2" border on the sides of the rug so that it lightly sticks to the glued backing which is usually tacky for quite some time. You want to fold in the 2" so that the edge of the rug has a waterfall edge or a lip. This will give it that professional look.
Fold in the corners to make a nice clean edge.
Using a hot glue gun, go around the perimeter of the rug until the cloth is completely glued. Be careful not to burn yourself.
Cut the backing fabric to the desired size of your rug. If there is excess fabric, trim as needed. If you are making a geometric rug, you will want to measure the backing before cutting. Remember, measure twice and cut once!
Using a spray adhesive (Roberts multi bond works well), spray the dried glue backing of the tufted rug. Try not to get any adhesive on the yarn. If you are worried about it, you can always use painters tape to mask off that area.
Because the spray is a web spray, it works best to spray both the back of the rug as well as the back of the fabric. Once both are sprayed, lay the fabric down right in the middle and use light pressure in the middle/inside and more pressure as you work out to the edges of your rug. Some people like to just spray the middle of the backing fabric and then spray as they lay each part down. Experiment and see what works best. Wear a mask and only use the spray adhesive in a well ventilated room as it is toxic. as well as the backing fabric. Use even motions and apply from the middle first and then work out to the edges of the rug.
Place the sprayed fabric onto the back of the rug and make sure none of the yarn gets caught behind the backing. Make sure the yarn is flowing out so that it can look like fluffy rugs and continue to masquerade the glue.
Press down with pressure. Start in the middle and work your way out. Use a brayer if necessary. The adhesive is really strong, so there shouldn't be a problem with sticking.
I like to reinforce the edges with some hot glue because sometimes the spray adhesive misses the perimeter. Fabric glue works well, too!
Trimming your rug
Trimming is an important step in the process and one you will not want to miss. Trim any hanging pieces of yarn on both sides. On the backside, you will want to trim so that the back is flat. Remember, this is a rug and will be on the ground. The last thing you’ll want are lumps and bumps! Once you trim with scissors, you’ll use the shaver to groom the rug and sculpt the appropriate shape.

Trim any hanging pieces of yarn
Clean and Maintain
Once your rug is dry, trim any stray yarns or uneven spots to perfect the finish. Regularly vacuum your rug to keep it looking fresh and remove dirt. Do not place it in the washing machine. If needed, spot-clean with a mild detergent to maintain its appearance.
Enjoy Your Rug
With the tufting complete and your rug finished, you can now place it in your chosen space. Enjoy the satisfaction of having created a custom rug that reflects your personal style and craftsmanship.

My first DIY tufted rug!
More DIY Rug Project Ideas
Tufting is such a fun project, but it's not for everyone. Crafting your own rug using items like old t-shirts, old clothes, and other fabric scraps is not just an easy way, but a great way to add a personalized touch to your home with materials you already have.
Whether you're aiming to make a small rug for your bathroom or a large area rug for your living room, the possibilities are endless. Here are some different ways to make a DIY rug at home:
1. T-Shirt Rag Rug
Using old t-shirts to create a DIY rug project is a popular choice due to the soft, pliable nature of t-shirt yarn. You can weave or braid these old fabric strips into a colorful t-shirt rug that feels cozy underfoot. The process involves cutting your old t-shirts into strips and either braiding them or using techniques like crochet to create a circular rug or a more traditional rectangular shape. This is a great idea if you're looking for a project that doesn't require a sewing machine.
2. Woven Rag Rug
If you have a sewing machine and a penchant for sewing straight lines, a woven rag rug can be a great way to utilize a variety of leftover fabric scraps, including old sheets and old shirts. This project can be as simple or as complex as you like. The weaving process involves interlacing fabric strips on a DIY loom, which can range from a small hand-held frame for a bath mat to a larger wooden frame for an area rug.
3. Braided Rag Rug
A braided rag rug is a fantastic project for beginners and doesn't require any special equipment. You'll simply need strips of fabric—any unwanted fabrics from old clothes to old bedsheets will work. Braiding these strips together and then stitching the braids into a rug can be done entirely by hand. If you're considering the size of your rug, remember that the longer your fabric strips, the larger your finished rug can be.
4. Denim Rug
Denim is the perfect material for a durable, hard-wearing rug, ideal for high-traffic areas. For a denim rug, you'll want to use the straight lines of the jeans' seams to your advantage, creating either a braided rug or a tufted piece if you're adventurous enough to use a tufting gun. This type of rug adds a modern touch to any space and is incredibly rewarding as it turns old jeans into a stylish new decor piece.
5. Crochet Rag Rug
For those who love crochet, turning fabric yarn made from old textiles into a rug can be a soothing project. Using a large crochet hook, you can work in rounds or rows to create your own rag rug. This method is particularly great for making circular rugs or oval bath mats.
By following these steps, you can create a beautiful and unique rug that adds a personal touch to your home. Tufting is a rewarding craft that combines artistry with practical skill, resulting in a one-of-a-kind piece that you can be proud of. Now that you've completed your first rug, go ahead and try another - you will get better and better the more you make.
If you have any questions about the DIY rug tufting process, email me at info@artbeatbox.com
Want to make more DIY home decor? Try making this starburst mirror!
FAQs About DIY Rug Tufting
What Kind of Fabric Do I Use for the Backing of My Tufted Rug?
The best thing for the backing of your tufted rug is either monk's cloth or primary tufting cloth. These materials are sturdy enough to handle the tufting gun's movement and dense enough to hold the yarn securely. Ensure the fabric is tightly stretched on your frame to avoid any wrinkles or movements during the tufting process.
How Long Does It Take to Make a Tufted Rug?
Creating a tufted rug can take anywhere from a few hours to several days, depending on the size of your rug and the complexity of your design. Using a tufting gun significantly speeds up the process compared to other rug-making techniques. For your first time, allot a long time to get acquainted with the equipment and the technique without rushing.
What Are the Best Yarns to Use in a Tufted Rug?
The best yarns for tufting are typically acrylic, wool, or a blend, as they are durable and come in a wide range of colors. Choose a yarn that matches the texture and feel you want for your rug. Thicker yarns will create a fuller and more luxurious rug, while thinner yarns are better for detailed designs.
Can I Wash My Tufted Rug in a Washing Machine?
It's not recommended to wash your tufted rug in a washing machine as it can damage both the yarn and the structure of the rug. Instead, spot clean your rug with mild soap and water or use professional cleaning services for deeper cleans. This will help maintain the integrity and appearance of your tufted rug for a longer duration.
How Do I Fix Mistakes While Tufting?
If you make a mistake while tufting, don’t worry—it's usually fixable. If the error is a misplaced yarn or color, simply pull out the wrong threads and re-tuft the area. If there's a larger issue, such as a design error, you might need to remove larger sections and re-tuft them. Always take your time to review your work as you progress to catch mistakes early.
What other tufting projects can I make?
Tufting can be used to create a variety of projects beyond rugs, including wall art, pillows, upholstered furniture, pet beds, decorative accents, and seasonal decorations, allowing for creative and personalized touches throughout your home and wardrobe.
Final Tips
Practice: If you’re new to tufting, consider practicing on a smaller piece of fabric before tackling your main project.
Safety: Always follow safety guidelines for operating the tufting gun. Wear protective gear if recommended, and handle the tool with care.
Maintenance: Regular maintenance of your tufting gun and tools will ensure they last longer and perform better.
In my experience, burlap works great because it has less give. I started off using monk cloth, but it needs to be stretched multiple times and sometimes this makes it hard to keep straight lines in your design.
Tufting guns only go in one direction, up and down. If you want to do curves or turn corners, you need to rotate the tufting gun. I find that keeping the handle completely vertical helps with this process.
Watch youtube videos! You will learn so much from finding a good fiber artist who explains everything from the first step to the last.
If you get a hole in your cloth, you can patch it. There are plenty of online tutorials describing how to fix this problem.
If your rug is not geometric, you will have to roughly cut the backing fabric and then trim as needed.
When just starting out, it is probably best to purchase a kit with the tufting gun and materials.