
30+ Hilarious Rock Painting Ideas That Will Make You LOL
People have been painting rocks since the beginning of time. That's because we can always use new ways to spread joy! A few years back, I started painting rocks and randomly left them around my neighborhood just as a fun thing to do in my free time. I haven't stopped making creative rock paintings since!
So I guess the point is, painting rocks is fun. Art distracts me. And funny rock painting is a great, great distraction! Plus, it makes people happy!

Easy Rock Painting Ideas: 30+ Funny Designs to Try
After I took a walk to the beach last week, I noticed that many of the rocks looked like noses, so we decided to make faces. Making these painted rocks was fun, but the best part was moving them around to make faces.
In this blog post, I'm sharing 30+ creative and easy rock painting ideas that will have you laughing and painting! These simple designs are perfect for all ages!
Favorite Rock Painting Supplies
Affiliate disclaimer: Although I stand by all of the products I use, I can receive a small commission from any products purchased via my affiliate links.
With all of my rock painting over the years, I've tried and tested a lot of rock painting supplies. Here's what I consider to be the best rock painting supplies:
Acrylic Paint or Paint Pens. My favorite brands are:
Rocks (smooth and flat ones work best)
Paint Brushes
*I do not like the deco brands - they leak and they're hard to work with. Plus, they smell!
** I love ordering supplies on Amazon because there are tons of selection results, free shipping (typically ships within a few business days) and it’s never final sale so if you change your mind, you can send the supplies back.
Check out my favorite items on my Amazon storefront. You’ll find a full page of all of my favorite things!
FAQs
Before we dive into this fun activity, here are some of the questions I get the most about rock painting designs.
Where Can I Find the Best Rocks for Painting?
For all rock projects, you will want to find a good rock. Smooth rocks are the easiest for adding details. Flat rocks are the perfect choice and there are usually lots of rock options near a river or a lake.
A great way to find the perfect rock is to head to the beach, but you can also buy bags of painting stones at your local craft store.
What are the Best Paints for Rocks?
First and foremost, acrylic paint works the best! I have always used Sharpie oil-based pens, but we tried out the water-based acrylic Chalkola markers and the results were incredible.
If you’re making rocks with kids, acrylic paint pens are a popular choice. They are MUCH easier to work with than using a brush. For small details, a paint brush is not the easiest way to go, so I recommend permanent paint pen markers with a fine tip or a nail dotting tool.
I also noticed recently that Folk Art recently rolled out a new line of paint specifically created for making dots on rocks. I tested out the dot paint and it worked beautifully!
Personally, I love the CHALKOLA MARKERS but I am sure that there are many great paint pens out there. Posca markers are always great, too! I tested a few different kinds and compared their efficacy. You can check it out here.
Can you use Sharpies on rocks?
I have always used sharpie oil based pens, but we tried out the water based acrylic Chalkola markers and the results were much better than the sharpies for this project because of the paint drying time.
Since oil paint takes too long, acrylic is best. Similarly, regular sharpies cannot handle the texture of the rock for too long. They will definitely work, but the markers will surely take a beating.
Are paint brushes or markers best for rock painting?
The markers easily glided along the surface of the rock and if you’re making rocks with kids, using acrylic pens is MUCH easier! Using a paintbrush for small details is not the easiest way to go, instead I recommend permanent paint pen markers.
But remember: paint pens need to be used with care. Too much pressing or pushing and they'll leak all over. If that happens, don't worry! You can still make it work!
How to Paint Rocks: Step by Step Guide
I have tried painting rocks using different methods and there are many ways to do it successfully. My typical method is to first paint the rock a background color with white paint using a brush and then use paint pens for the details. You can also spray paint the base layer.
There really is no wrong way to paint rocks, but here's what I recommend for stone painting with kids of all ages:
1. Prep
- Give your rocks a quick wash and let them dry in the sun to help your paint stick better.
- Once the rock is dry, paint the entire surface with a base coat white acrylic paint. Think of this as priming your canvas. If you're starting out with a white rock, you can skip this step.
2. Design
- For best results, sketch your design using a pencil. This will help you visualize the different colors and layers you'll need before starting. You can use draw a freehand design or use a stencil
3. Paint

Prep & paint your rock
Once the white paint is dry, it is time to pull out all of the bright colors. This is such a fun activity to do with kids at any age. But remember, acrylic paint stains - so use smocks accordingly!
- Layer: Start by painting background colors or large areas with a paint brush. Let each layer dry before adding another.
- Detail: Use paint sticks or dotting tools to add smaller lines, details, or features of your design. I love to use this dotting tool to add eyes and mouths.
4. Seal

Seal the painted rock design with Mod Podge
In order to protect your rock art from the elements, it's a great idea to seal them. I recommend using Mod Podge outdoor sealer (they will not stay sealed forever, but they will stay sealed for a fairly good amount of time (perhaps a year or so).
If you want a stronger sealant, you'll want to use an acrylic spray-on sealer. You can find these at any art supply store or home improvement store.
Be sure to seal the rocks outside or in a well ventilated space. (Especially if you're using a spray sealer) For detailed instructions on sealing your rocks, check out this post.

Use painted rocks outdoors
Tips & Tricks for the Best Painted Rocks
To prevent smudging on your painted rocks, always work in layers. Allow each layer to fully dry before moving onto the next layer.
Try taping stencils to the rock to prevent them from shifting while painting.
If you make a mistake, that’s okay! Try to see if you can turn it into something cool with your artistic skills. If all else fails, paint over it in white and start again!
The best way to write on rocks with paint pens is by placing the rock on a flat surface and holding it tightly with one hand. Use the paint pen in the other hand with slow and steady movements.
How do you get paint pens to work?
GENTLY SHAKE THE MARKERS
PUSH DOWN ON PAPER UNTIL THE INK FLOWS DOWN
DRAW YOUR ROCK DESIGNS (FOR ROCK IDEAS, SEE BELOW)
LET DRY
ADD MORE LAYERS
SEAL (optional)
Easy peasy, right?
30+ Hilarious Painted Rock Ideas That Will Make You Smile

Make a painted rock face with bright colors
The possibilities are endless when it comes to rock designs. An easy way to decide which way to paint is to brainstorm a list of new ideas for rock painting. If you need a little inspiration here are 30+ of the best rock painting ideas to get you started:
Cute Animal Rock Painting Ideas
Making animal rocks is a great craft for kids of all ages. You can use them as rock pets for younger kids or paint more realistic animals with older kids. You will have so much fun painting these with the whole family!
Fish Rocks

Image Credit via I Love Painted Rocks
Smooth stones are the perfect shape for painting fish. Start by painting the background of the rock blue, then use a black paint pen for the outline of your fish. Draw black lines in a scallop pattern for the scales.
Finally, paint your fish a bright color and add some details like bubbles. This website seems to have some wonderful rock art ideas for painting fish.
Clownfish (Nemo) Rocks

Image Credit via A Girl & A Glue Gun
These clownfish rocks are too fun! Paint smooth oval rocks with bright orange, white, and black stripes to create your own school of Nemo fish. The googly style eyes make them come alive - kids (and adults!) will be obsessed with how realistic they look sitting among other rocks.
Pet Cactus Rocks

Image Credit via The Best Ideas for Kids
Okay so a cactus isn't an animal.. but if you paint pet cactus rocks it kind of goes with the category! Plus, this design is super easy. All you need is green and white paint and some googly eyes!
Ladybug Rocks

Image Credit via Easy Peasy and Fun
This fun design is a popular choice if you're looking for easy rock painting ideas. Flat rocks make the perfect ladybug shape! I love the extra touch of the googly eyes.
Bird Rocks

Image Credit via Easy Peasy and Fun
As simple painted rocks go, these birds are just so cute! I think it's the big, expressive eyes. If you make a lot of these cute painted rocks you can have a whole flock! Plus you're guaranteed to have a great time during this art activity.
Turtle Rocks

Image Credit via Crafty Morning
I love turtles and love this simple rock design.
You can also try your hand at owl rocks with googly eyes, dog rocks, cat rocks, little bird rocks, or pet rocks. This is a fun way to let your imagination run wild! And who doesn't love a pet rock?
Holiday Painted Rocks
Need a last minute gift idea? The possibilities are absolutely endless when it comes to easy painting ideas for Christmas rocks, Halloween rocks, Easter rocks, Valentine's Day rocks, and more! These beautiful designs make great gifts, too.
Conversation Heart Rocks

Image Credit via Sustain My Craft Habit
Remember conversation hearts? I love the idea of painting these Valentine's Day rocks from Sustain My Craft Habit and giving them out as handmade Valentines. What a fun project and great gift!
Valentine’s Heart Rocks

Image Credit via Janine Huldie
These adorable Valentine's Day rocks are perfect for spreading love and laughter! Paint smooth rocks with bright pink and red hearts, add sweet messages like "Be Mine" or "XOXO," and you've got the cutest Valentine's gifts ever.
Peep Rocks for Easter

Image Credit via Crafts by Amanda
I love the idea of making peeps. Check out these simple Easter rocks that are great for younger children.
"Mom" Tattoo Rock

Image Credit via Rock Painting 101
I love this classic "Mom" tattoo rock from Rock Painting 101! Paint it just like the old-school sailor tattoos with a red heart, banner, and that retro font. It's the perfect mix of tough and sweet. This would make such a hilarious Mother's Day gift or just a fun way to show mom some love.
Candy Corn Rocks

Image Credit via Rock Painting Guide
If you're looking for simple ways to get started with rock painting, it doesn't get much easier than these candy corn rocks from Rock Painting Guide! The shapes of these rocks make them look like actual candy corn!
Gingerbread Man Rocks

Whether or not you celebrate Christmas, these gingerbread man rocks are a creative way to celebrate winter. You can buy these rocks on Etsy, but I think they'd be pretty easy to DIY too!
Kindness Rocks

kindness rocks

this will make someone’s day!
Have you heard of the kindness rocks project? Put inspirational messages, quotes, positive phrases, or special notes on your rocks and leave them for others to find or give them as a thoughtful gift.
These random acts of kindness make people SO happy! I am telling you...you do not need to spend a ton of money to make people feel special.
Kindness Rock Basket

Image Credit via Big Life Journal
I love this idea from Big Life Journal of creating a basket of kindness rocks with words of encouragement to take or pass along. This would be a great lesson about the power of a positive message!
Inspirational & Fun Rocks

Image Credit via Rin Dawsonn
I love the idea of combining an inspirational message or message of kindness with a colorful rock pattern like this idea from Rin Dawsonn. It makes a seriously fun rock!
Fruit Painted Kindness Rocks
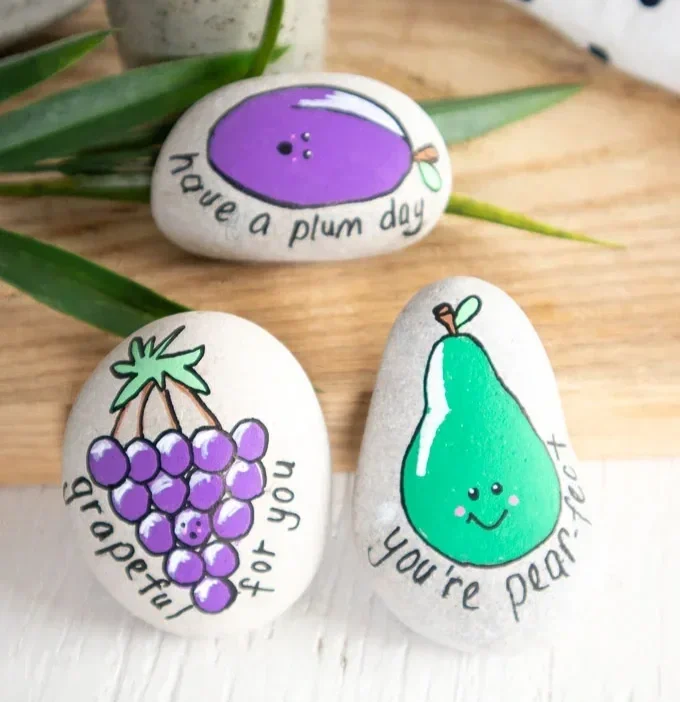
Image Credit via Sustain My Craft Habit
These fruit painted kindness rocks from Sustain My Craft Habit are absolutely adorable! Paint rocks to look like tiny strawberries, oranges, apples, and pears, then add funny puns like “Orange you glad we're friends?” Perfect for sharing with anyone who needs a smile!
Funny and Witty Rock Painting Ideas
These fun ideas crack me up and make other people laugh, too. Isn't that what art is all about?
Silly Rock Faces

Facial features painted on rocks
We noticed that a lot of the rocks at the beach looked like noses so we decided to make some funny painted rock faces with them. We had so much fun making these silly rock faces, but you could also use this idea to make a silly monster rock painting!
Rock Paper Scissors

Image Credit via Pinterest
I particularly love this witty rock design. Sometimes the simple ideas are the best!
Rock Painting for Dummies

Source Unknown
This genius rock is absolutely hilarious! Paint your rock to look like the classic yellow and black "For Dummies" book cover, complete with the iconic cartoon character. Guaranteed to crack people up when they find it.
Rock School Supplies

Image Credit via Color Made Happy
The teacher in me just loves these from Color Made Happy! This DIY funny rock painting idea would make the perfect gift for a new teacher.
Punny Emoji Rocks
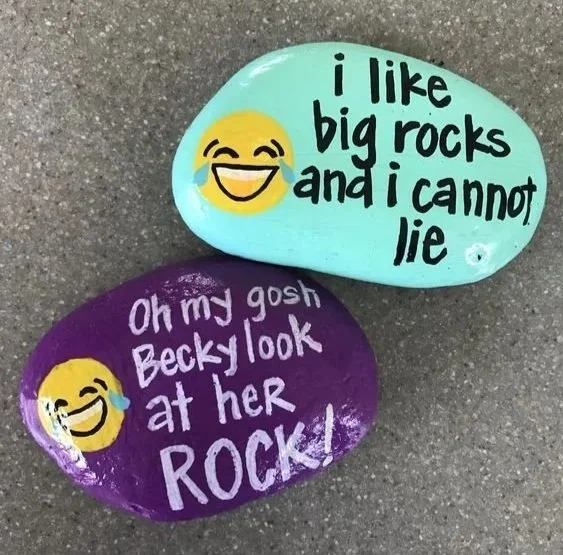
Source Unknown
These punny emoji rocks are so funny! Paint bright backgrounds and add rock-related puns like "I like big rocks and I cannot lie" or "Oh my gosh, Becky look at her ROCK!" The crying-laughing emoji faces are the perfect touch. Guaranteed to make any music lovers day!
Creative Fruit and Vegetable Rock Painting Designs
I painted some fruit and vegetable rocks to leave around my neighborhood and they disappeared pretty fast! One of my favorite tips for painting fruit and vegetable rocks is to revolve your design around the shape of the rock.
Strawberry Rocks

Image Credit via Sustain My Craft Habit
This easy rock painting idea from Sustain My Craft Habit would make a great addition to a fairy garden. It's hard to believe those aren't real strawberries and are actually painted stone!
Garden Marker Rocks

Image Credit via Adventure In a Box
I love the idea of using funny rock painting ideas in your garden, or making a rock garden in an outside play area. A garden is the perfect place for painted rocks!
Advanced Food and Dry Goods Rock Art Ideas
I'm amazed by the unique rocks you can find! These food rocks are seriously next level.
Nostalgic Brands

Image Credit via Reddit
These rocks with nostalgic brands are insane! I am obsessed with how realistic they are!
Realistic Food Rocks

Image Credit via I Love Painted Rocks
Check these out! If you didn't already know they were rocks you might mistake them for actual food...
Silly & Goofy Rock Ideas
LEGO Minifigure Rocks

Image Credit via Frugal Fun 4 Boys
These LEGO minifigure rocks from Frugal Fun 4 Boys are so clever! Paint rocks to look like tiny LEGO heads with different expressions - happy, surprised, angry, or silly faces. The key is using that bright LEGO yellow!
Shark Painted Rocks

Image Credit via Sustain My Craft Habit
These shark painted rocks from Sustain My Craft Habit are so cool! Paint rocks gray and add those classic triangular fins and sharp white teeth - they look ready to swim right off the rock pile. Kids will love making (and finding!) these funny rocks!
Pokemon Painted Rocks

Source Unknown
These Pokémon rocks are absolutely adorable! Paint rocks to look like Pikachu, Squirtle, Charmander, Bulbasaur, and don't forget the classic Pokéballs. The cute expressions and bright colors make them look just like the real characters. Kids (and nostalgic adults!) will go crazy for these!
Nintendo Painted Rocks

Image Credit via @kspaintedrocks
These Super Mario rocks are incredible! Paint Mario, Luigi, Yoshi, Toad, and all your favorite characters, plus classic elements like Fire Flowers, Super Stars, and Goombas. Perfect for gamers of all ages!
Sports Team Logo Rocks
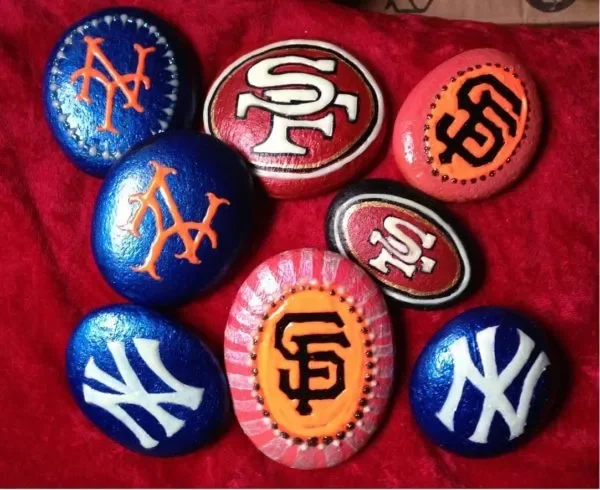
Image Credit via Your Spirit Rocks
These sports team logo rocks from Your Spirit Rocks are perfect for showing team spirit! Paint your favorite baseball teams like the Yankees, Mets, Giants, or 49ers with their official colors and logos.
Happy Crafting!
Whichever designs you decide to use, just make sure you're prepared with supplies and a smock or old shirt. And...do NOT use tempera paint. This kind of paint won't last outdoors and your works of art will vanish.
Remember, the main thing with rock painting projects is to just have fun! I hope you enjoyed these amazing rock painting ideas. Let me know which projects you try first!