
DIY Rhinestone Knit Gloves Tutorial

DIY Rhinestone Knit Gloves Tutorial
A few weeks ago, I saw my childhood friend. She was always so fashionable, and her closet is a dream space! She showed up with the most beautiful, dazzling gloves and I went crazy for them.
When I searched for rhinestone knit gloves to purchase, I didn’t love what I found, so I decided to make my own. I am obsessed with the results and decided to write a full tutorial for you to make them, too!
Winter is right around the corner, and you know what that means cold hands! If you’re stuck wearing gloves anyway, you may as well make them sparkle. Am I right, or am I right?!!
During these dark winter days, I try adding some bling to almost everything! And for this tutorial, I’ll be adding some rhinestones to my Ugg gloves.
I’ll be hand placing the rhinestones in this tutorial because rhinestone templates aren’t the best method for blinging shoes. Rhinestone templates work well with other canvas projects though!
Want to learn the best hand placement techniques and how to make custom rhinestone templates? Check out my digital rhinestone courses – they’re perfect for bedazzlers of all skill levels!

Are you ready to bling it on?
Bring your designs to life and let your creativity truly sparkle with our comprehensive rhinestone course.
What is needed to make Rhinestone Knit Gloves?
Affiliate disclaimer: Although I stand by all of the products I use, I can receive a small commission from any products purchased via my affiliate links.
Washable marking pen
1. Take your gloves out of their original packaging and place them on your work surface so that they can lie flat. Be sure the gloves fit because if you accidentally received the incorrect item, return packages are trickier once those original tags are off!
Use thin cardboard or cardstock and cut an insert and place it inside the glove to help when placing the rhinestones.

Place an insert in the gloves
2. Using your washable marking pen, gently mark off where you want the rhinestones to go. Feel free to use either a pattern or random designs.

Use a washable pen to mark where the rhinestones will go
3. Using a Q-tip, add a dab of rubbing alcohol to each spot you’d like to bedazzle.
4. Using either a toothpick or a needle-tip glue bottle, add a dab of glue. Be sure not to add too much. You do not want the glue seeping out on the sides of the rhinestones.

Place a dab of glue on a mark
5. Using your wax pencil or wax pen, add the rhinestone to the gloves. Push firmly.

Apply rhinestones with a wax pencil
6. Allow the glue to dry for 24-48 hours. The glue will continue to cure over the next week.
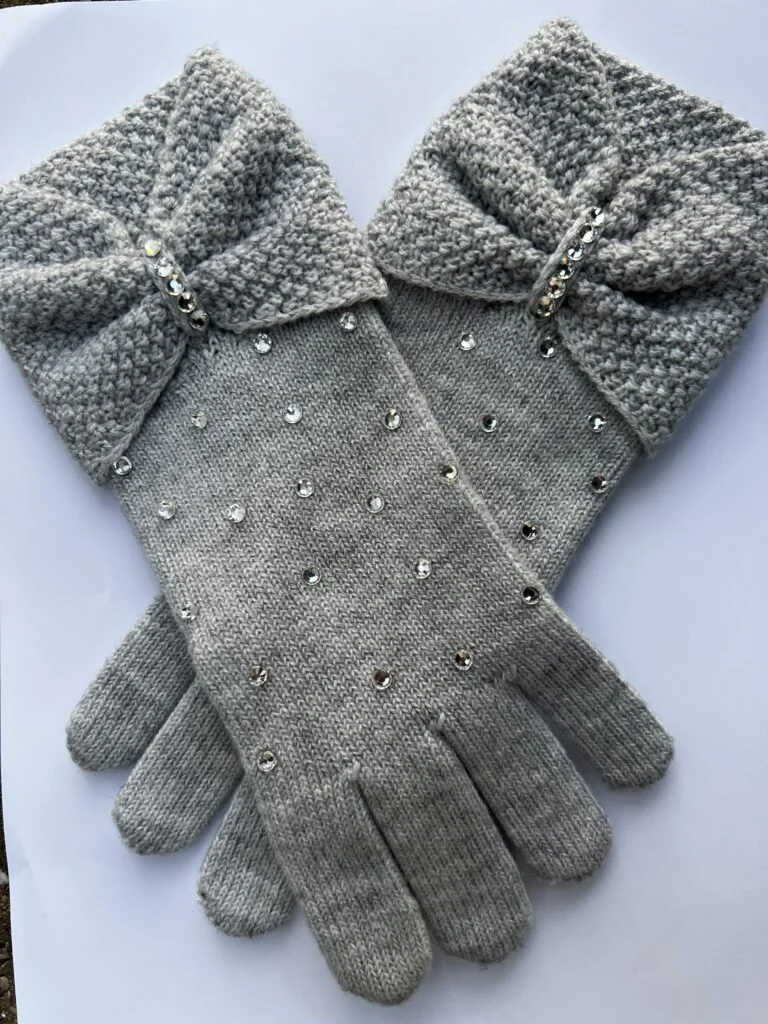
Finished DIY rhinestone knit gloves
* I used E6000 for this project. Only use E6000 in a well-ventilated room with a mask. If you are looking for alternatives, try Loctite or leather glue. In my opinion, however, E6000 works best.
If you want to add rhinestone rivets, you will need a rivet machine (often used in leather work). The reason I do not love working with rivets is because when I put the gloves on, I can feel the cold metal inside.
Rhinestone knit gloves for stores typically have fabric sewn over the rivet backings to keep them secure. If you are making leather gloves, do some research to see how to prep the leather before applying the rhinestones.
Do you love making things with rhinestones? If so, you will love this post.