
Rolled Magazine Leaves

This is a perfect Fall craft using recycled magazines to make beautiful, colorful leaves.
Rolled Magazine Leaves
Turn Trash into Treasure: Rolled Magazine Art for Eco-Friendly Creativity
If your recycling bin is filling up these days, that means it is time to use recycled magazines to make beautiful wall art! I am still in disbelief about how cool this project is!
Have you ever made art using recycled magazines? This time of the year I am receiving non-stop junk mail in the form of magazines, flyers and catalogs and I am always looking for new ways to give those glossy pages a second life. I regularly recycled art projects to do with my classes and this project is good for all ages - younger kids might need a bit more support. I feel incredibly guilty about all of the wasted paper so I came up with this perfect Fall project. And I have to say, this one is a major hit!
This recycled rolled magazine art project requires patience so if you have it…then this is the craft for you! This is the kind of project you won’t want to throw away - in fact, I regularly get compliments on this one. While this might not be a five minute craft, you can definitely get this done in a little over an hour.
WHAT DO I NEED?
Affiliate disclaimer: Although I stand by all of the products I use, I can receive a small commission from any products purchased via my links.
MAGAZINES
PENCIL
HOT GLUE GUN (This is my absolute favorite glue gun)
LEAF TEMPLATE OR STENCIL
BRISTOL PAPER
HOW DO I MAKE THEM?
I’ve laid out the step by step instructions for making beautiful magazine leaves. This should take about two hours from start to finish depending on your patience and how fast your hands can roll paper! Throughout this tutorial, I will be referring to the rolled magazines as “straws” because essentially, you are creating custom straws.
Step 1: Rip or Cut out the Magazine Pages
Cut or rip all of your magazine pages. They should be about 8.5” x 11 “ once ripped.
Step 2: Fold
Fold each page in half and then fold in half one more time. This will create 4 quadrants.
If you want a giant leaf, you can adjust accordingly by making sure each paper strip is larger - so perhaps you’d fold only once rather than twice. But I like the size I’ve used in this project.

Step 3: Cut
Using your scissors, cut along the folds. You are essentially cutting the paper into quarters. Each page should provide 4 rectangles.

Step 4: Roll
Lay down one cut magazine rectangle and lay flat on the work surface. In my experience, this project looks best if it is colorful, so you will want to think in reverse. By this I mean that you want to see which side is the most colorful and then place it face down.
Place the pencil on top of the magazine starting at the corner. The pencil should be perpendicular to the magazine and the pencil should be centered on top of the corner, not towards the tip or towards the eraser.
Starting at the end of the strip, gently roll the magazine around the pencil. You do not want to roll too tightly because otherwise the paper will be completely stuck on the pencil. If you’ve ever played with a Chinese finger trap toy, this is what happens when you roll too tightly. So, ease up on the rolls! You should easily be able to slide the pencil out from the roll if necessary. If you’d like to skip the pencil, you can also roll by hand if you're comfortable. However, the rolls will not look as uniform.
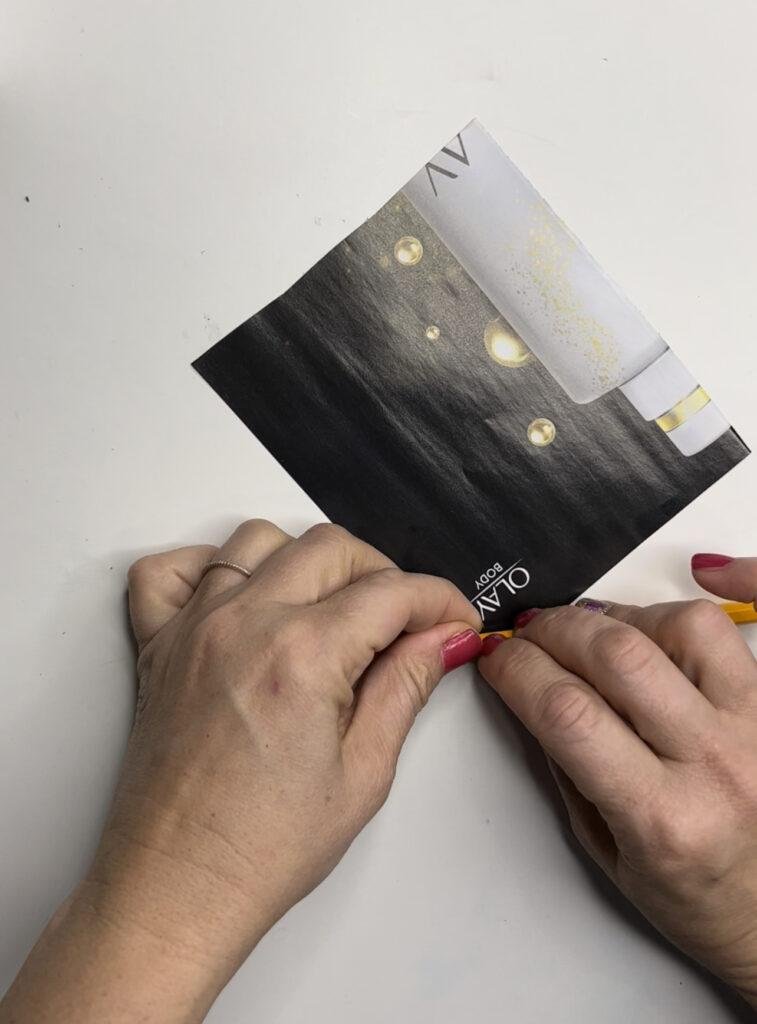
Step 5: Glue
Roll until you have about 2” left to go. Apply glue stick the the small triangle.
Be sure to get the edges and fill in the entire exposed space. You do not want to skip this step - this is how you will turn your magazines into paper straws that keep their shape. It is imperative that you use glue that will last. If you do not have a glue stick, school glue or tacky glue work great, too!
Continue this process until you have made about 20 paper magazine straws.

Step 6: Remove the pencil and repeat the steps 20 more times!
Step 7: Design
Now comes the fun part, start organizing your magazine straws by color. See which ones you like best and place them in an order that is visually appealing to you.
On a piece of heavy cardstock, bristol or poster board, draw a leaf. You can also trace a leaf from outside or find a simple leaf on the web.
Cut out the leaf.

Step 8: Apply to bristol
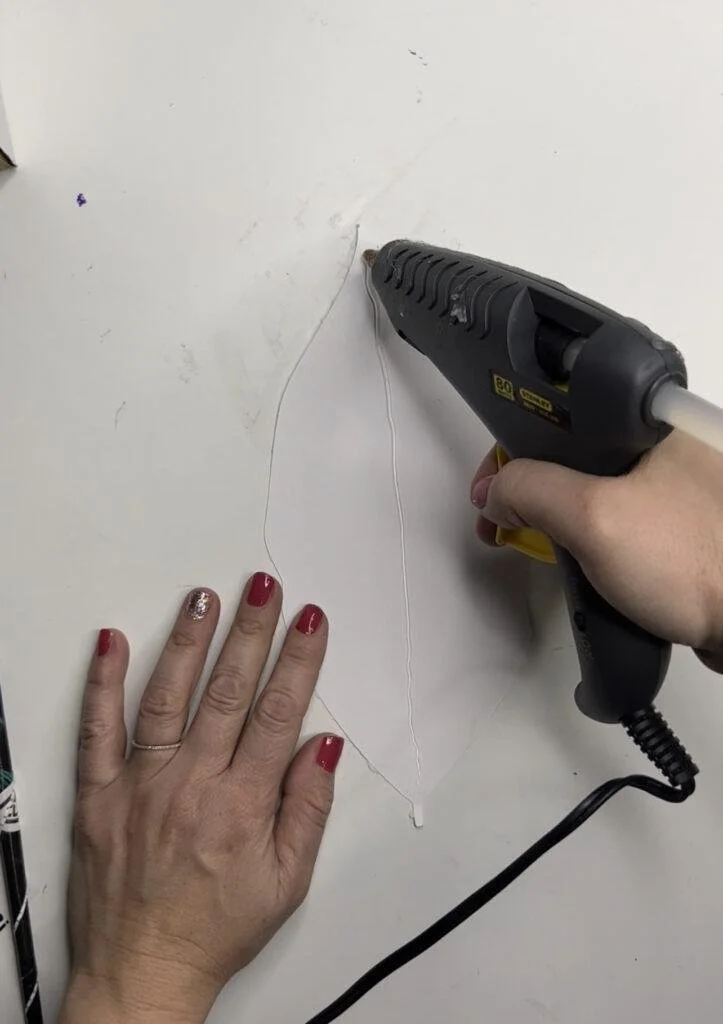
Starting with the center spine of the leaf, glue one long magazine straw onto the bristol paper.
Next, begin cutting several of your magazine straws in half.
Using your glue gun, begin gluing these on a diagonal. Do not worry if they look too long, we will be trimming them to look more uniform.

Cut remaining magazine rolls in half
Cut remaining magazine rolls in half

Step 9: Cut
Once every little tight space is filled, you can go ahead and turn the leaf over to the other side.
Trim any straws that are too long. If any straws open up, simply glue them back down either with your glue stick or with the glue gun.

Keep going!

Keep going. Try to balance your colors.

To preserve your artwork, coat the finished piece with a thin layer of Mod Podge or clear glue. This adds shine and durability.

Apply hot glue to the back of the leaf.

Step 10: Frame
Once your leaf is completely dry, hot glue it into the back of a shadow box. Alternatively, you can do this onto the front surface of a canvas!
Using hot glue, glue the finished leaf onto your canvas or shadow box backing.
Place inside the frame and enjoy!

Place leaf onto canvas

Tips and Variations
Try different sizes. Wide strips make chunky veins, while narrow strips look delicate. If you want extra large leaves, use a bigger magazine or piece of paper. If you want smaller, you can use smaller pieces and then use something that is thinner than a pencil (perhaps a skewer)?
Experiment with old books or newspapers instead of magazines - newspaper leaf garlands would be cool!
Layer for depth. Stack multiple leaves on top of each other for a 3D effect.
Mix materials. Combine magazine strips with book pages, newspaper, or colored craft paper.
Add shimmer. Brush edges with metallic paint or glitter glue for a festive touch.
Final Thoughts
If you’re looking for new projects to make using old books or magazines, this project can be created using a variety of materials. I made this exact project using loads of painted and gelli printed papers from my art classes. You can see that tutorial here! Making rolled magazine leaves is more than just a craft—it’s a meditative, mindful activity that celebrates creativity and sustainability. Each strip you roll is a small act of transformation, turning overlooked paper into something beautiful.
Whether you’re decorating for fall, adding handmade touches to gifts, or simply enjoying a quiet creative moment, these leaves are proof that art can be made from the simplest of materials.
So grab that stack of old magazines, roll up a few strips, and watch your leaf collection grow. Once you start, you’ll find it hard to stop—after all, nature never makes just one leaf at a time. If you’re looking for more magazine crafts, check out this tutorial! Happy Crafting!
I hope you have as much fun making this rolled magazine leaf craft as I did!
If you like recycled art, you’ll love making this recycled stuffed animal chair!