
Easy DIY Sculpey Polymer Clay Trinket Bowl Tutorial

Easy DIY Sculpey Polymer Clay Trinket Bowl Tutorial
Mother’s Day will be here before we know it, and what better way to show the mothers in your life some love than with a handmade polymer clay trinket bowl? Turn average ring dishes into little works of art with easy to use oven bake clay!
These DIY trinket dishes are not only a practical solution for organizing small items – they make a great gift too! They’re not just for moms to use as ring dishes. Dad’s can use them for spare change and they’re a thoughtful gift for teachers too!
In this blog post, I’ll share two different methods for making a DIY polymer clay trinket bowl. This is one project where you can truly let your creativity shine!
What’s the best clay to use for DIY trinket bowls?
My absolute favorite clay to use for DIY marble coasters is Sculpey polymer clay. Sculpey clay is a breeze to work with. It’s super pliable, so you can shape it just right, and it bakes up strong, ensuring your coasters will last through countless cups of coffee. Plus, the range of colors means you can easily adapt this tutorial to fit your style.
What you’ll need to make DIY clay trinket bowls
Affiliate disclaimer: Although I stand by all of the products I use, I can receive a small commission from any products purchased via my affiliate links.
White polymer clay (I prefer Sculpey)
Different colors of polymer clay (I’m using pink, blue, and yellow)
Clay tool
Toothpicks
Clay leveling guide
Clay tile work surface
Small glass bowl (2-inch bowls work well)
Oven
Aluminum foil or parchment paper
Oven thermometer (optional, but getting the temp right is super important)
*I love ordering supplies on Amazon because there are tons of selection results, free shipping (typically ships within a few business days) and it’s never final sale so if you change your mind, you can send the supplies back.
Check out my favorite items on my Amazon storefront. You’ll find a full page of all of my favorite things!
Two methods to make DIY clay trinket bowls
Wipe down your work area (baby wipes work great) and make sure you have clean hands to avoid getting dirt or debris in your clay. It’s best to work on ceramic surfaces.
Method 1: The Scrap Trinket Bowl
1. Take about ⅓ of the white clay from the clay package and form into a ball.

Form white clay into a ball
2. On your ceramic tile surface, place your 4mm clay leveling guides on either side of the ball. Using the acrylic roller, form a slab by rolling out the clay until it has the thickness of the guides.
Roll out the clay
Continue to flip and rotate the clay while rolling it out. Once complete, place aside.
3. Take ¼ of a brick of a colored clay of your choice and form into a ball.
4. Break off small pieces from the colored ball and roll into little snake shapes. Place on the white slab in any direction you choose (just like decorating a pizza).
5. Select another clay color of your choice. Make some tiny balls and scatter those onto the white slab. It is okay to overlap colors on the white slab.
6. Add any additional color clay shapes to decorate the slab.

Make a pattern with different colors of clay
7. Using the acrylic roller, roll the freshly decorated clay using light pressure until the slab feels smooth. This means, you are rolling over the decorations.

Roll the pattern into the clay base
Don’t worry about tiny imperfections – you won’t notice them once the project is complete!
8. Add texture details using the clay tool and your toothpick.

Add texture details
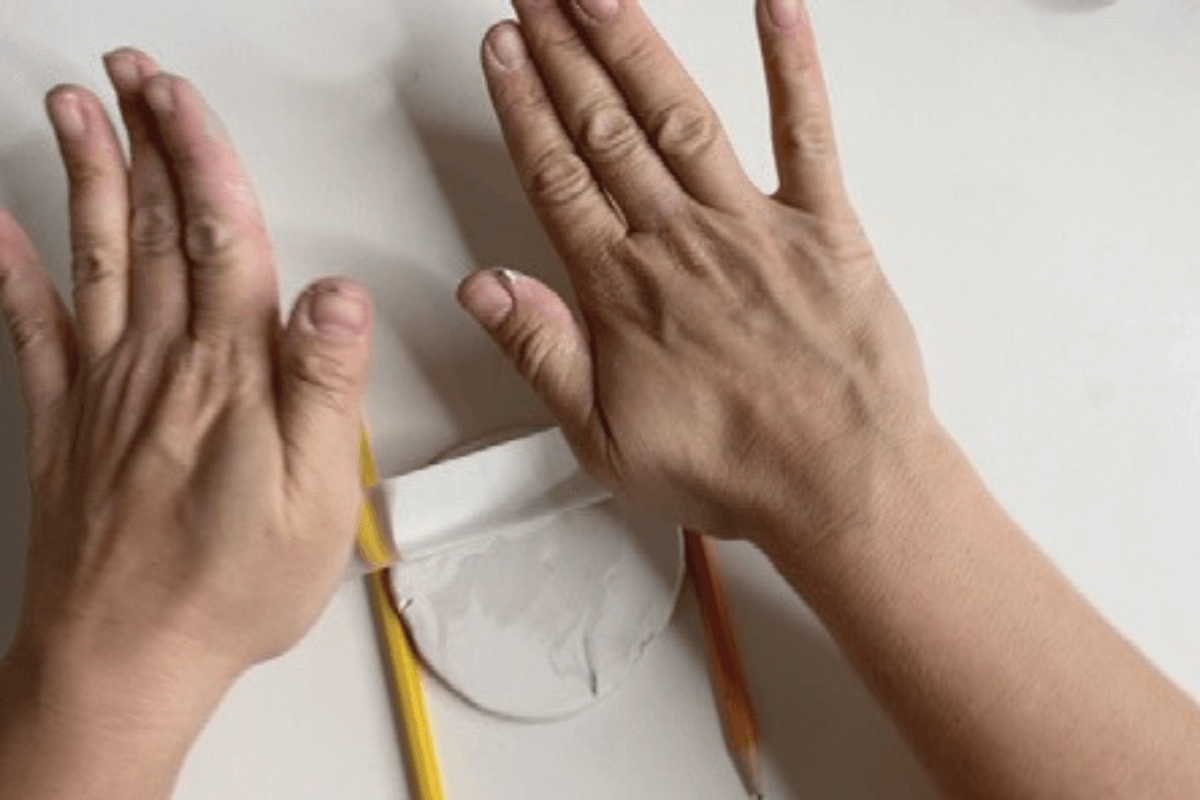
9. Take the glass bowl and place it upside down. This will become your mold. Make sure the bowl you use has an oven-proof surface.
10. Drape the clay over the bowl and gently press down (do not push too hard on the clay because you will be removing the glass bowl after baking). You can smooth the edges if you choose.

Drape the clay over a small white dish to form a bowl shape
If your clay is too large to fit the mold, use a polymer clay cutter to trim the excess.
11. Line a baking sheet with aluminum foil. Parchment paper, wax paper, or an oven-safe work mat would work too. Place your project (including the glass bowl) onto the sheet.
12. For the best baking results, bake at 225 degrees for 20-25 minutes. Be sure not to raise the temperature – burnt clay has an awful smell!
Use an oven thermometer to be sure the temp is right.
13. Let cool and gently separate the clay trinket bowl from the glass bowl.
Method 2: The Spiral Trinket Bowl
1. Take about ⅓ of the white clay from the clay package and form into a ball.
2. On your ceramic tile surface, place your 4mm clay leveling guides on either side of the ball. Using the acrylic roller, form a slab by rolling out the clay until it has the thickness of the guides.
3. Take ¼ of a brick of three different colors of the clay of your choice and form into 3 gumballs.

Roll 3 colors of clay into small balls
4. Using the acrylic roller, roll each clay ball into separate pancakes.
5. Layer the pancakes, one on top of another.

Stack each layer of clay on top of one another
6. Gently roll the pancakes together like a jelly roll.

Roll the clay layers together
7. Using your clay tool, slice the clay roll.
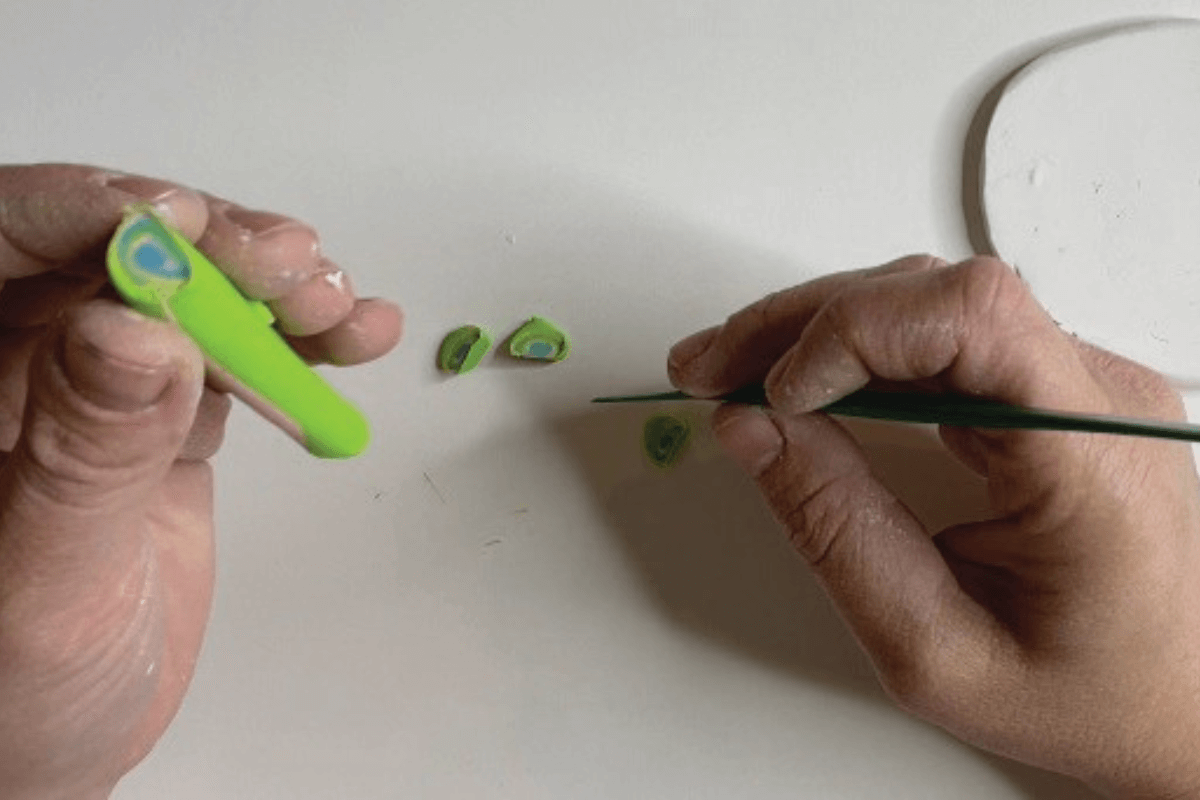
Slice off pieces of the clay roll
8. Place the slices on top of the white slab (as many as you want; in any pattern or direction).

Decorate the white slab with your spiral pieces and scrap clay
9. Experiment by adding any scraps you want to fill the remaining areas of white clay.
10. Using the acrylic roller, roll the freshly decorated clay using light pressure until the slab feels smooth. This means, you are rolling over the decorations.

Roll the clay with the acrylic roller
11. Add texture details using the clay tool and your toothpick.
12. Place the glass bowl upside down and use it as a cookie cutter. Use a toothpick to cut the clay. Save the scraps!
13. Line a baking sheet with aluminum foil. Parchment paper, wax paper, or an oven-safe work mat would work too. Place your project (including the glass bowl) onto the sheet.
14. For the best baking results, bake at 225 degrees for 20-25 minutes. Be sure not to raise the temperature – burnt clay has an awful smell!
Use an oven thermometer to be sure the temp is right.
15. Let cool and gently separate the clay trinket bowl from the glass bowl.
If you prefer your clay bowls to have a more glossy finish, you can apply some Mod Podge once the trinket dishes have cooled. This step is optional, but will make them more durable.
Now you have a beautiful handmade trinket dish ready to help you stay organized with your small items. The best part about these DIY clay trinket bowls? They also make perfect hostess gifts or birthday presents!
FAQs (Frequently Asked Questions) about DIY clay trinket bowls
Can I use air dry clay to make DIY trinket dishes?
Absolutely, you can give air dry clay a try for your ring dishes. It’s a fun alternative to polymer clay and doesn’t require baking. Just keep in mind that air dry clay tends to be a bit more delicate than polymer clay once it dries, so handle your clay bowls with care.
What’s the best way to seal and protect my handmade trinket dish?
After baking, you can use a clear sealant or varnish to protect your trinket dish from wear and tear. This step also gives your clay bowls a lovely glossy finish. Simply follow the instructions on your chosen sealant product for the best results.
Tips & tricks for working with Sculpey polymer clay
You can clean up Sculpey using a baby wipe or any household
cleaners.
Sculpey does not dry out.
Store extra clay in aluminum foil or a Ziploc bag. Do not store in an
acrylic container.
Looking for more clay projects? Check out this post!