
The Best DIY Craft Ideas Using Flat Glass Marble

In my 23 years of teaching functional art classes/workshops, this stands out as the one project I can do again and again with any age or ability. The end result is so beautiful and unique that even older kids love creating these works of art!
The best part? You can get pretty much everything at the dollar store!
When it comes to crafting with kids, I have found that functional art typically doesn't get tossed out because few items blend functionality with creativity as seamlessly as a glass flat back marble trivet.
Crafted with care and attention to detail, these trivets not only protect your surfaces from heat but also add a touch of color to your living space. Creating one of these beautiful flat back glass marble trivets is easy, cheap and looks incredible!
Materials needed to Craft Ideas Using Flat Glass Marble cartoon trivet:
Glass flat back marbles: These flat glass marbles are readily available in craft stores, the craft section at the dollar store or online. Choose marbles of uniform size and shape for consistency in your trivet.
When choosing glass marbles, be sure they are clear glass and not frosted or colored - those will not work as well. You can use different colors as a border or an accent, but I wouldn't do that. Do not worry, you can always use those colored marbles with other marble crafts.
Adhesive: Opt for a strong, clear adhesive that bonds well with glass and other materials. You do not need to use toxic adhesives to create a trivet that can hold up for years to come.
Base material: You'll need a sturdy, heat-resistant base for your trivet. Options include ceramic tiles, wooden plaques, or even heat-resistant glass. I personally love the glass and square trivets from the dollar store.
Felt pads: These will be attached to the bottom of the trivet to protect your surfaces from scratches. If you can't find felt pads, you can use silicone. Luckily, the glass trivets from the dollar store already have silicone pads.
Cartoons/Comics/Pictures or Magazines: I have made this project many ways over the years. Kids love using comic books, but this project looks amazing with sheet music, magazines and newspapers.
Whichever you end up using, just be sure to pick something thin and flat.
Foam Brush
How to make a flat back gemstone trivet
1. Rip up or cut up your images until they are around one inch square.
2. Using your foam brush, apply a thin layer of glue directly on top of the glass. Continue adding comics until the entire trivet is covered. If any scraps hang over the edge, wait until the glue dries and trim off the excess.

Glue comic strips until the entire trivet is covered
Using your glue, add a dab of glue directly to the trivet. Place a glass marble and push it down to be sure it is securely glued to the trivet. Once adhesive is applied, press each marble firmly onto the base material, holding it in place for a few seconds to ensure proper adhesion.
Work methodically from one side of the trivet to the other, pressing down each marble as you go.

Glue the glass marbles directly to the trivet
Take care when arranging the new marbles - you will want to make sure there is virtually no gap between them. In my experience, using the same size glass flat back marbles and keeping them close together is a recipe for success.
A great place to start adhering the marbles is along the outside perimeter and then work in circles if it is a round trivet, or in rows if it is a square trivet.

Start gluing the marbles on the perimeter and work inward
3. Allow the glue to dry.
4. Once all the marbles are in place, allow the adhesive to cure fully according to the manufacturer's instructions. This typically involves letting the trivet sit undisturbed for a specified period of time, often overnight, to ensure a strong bond.
The glue will dry clear but will look milky and white until it is dry. Sometimes the wet glue gets trapped under the marble and might look like it won't dry. Do not worry; it will dry over the course of several days. Wait until the glue is dry before using your trivet.
5. Once the adhesive has cured, flip the trivet over and attach felt pads to the bottom corners. These pads will not only protect your surfaces from scratches but also provide a slight elevation to prevent heat transfer when the trivet is in use.
With the felt pads attached, your glass flat back marble trivet is ready for use! Place it on your dining table or kitchen counter to protect surfaces from hot pots, pans, and dishes while adding a touch of elegance to your decor.
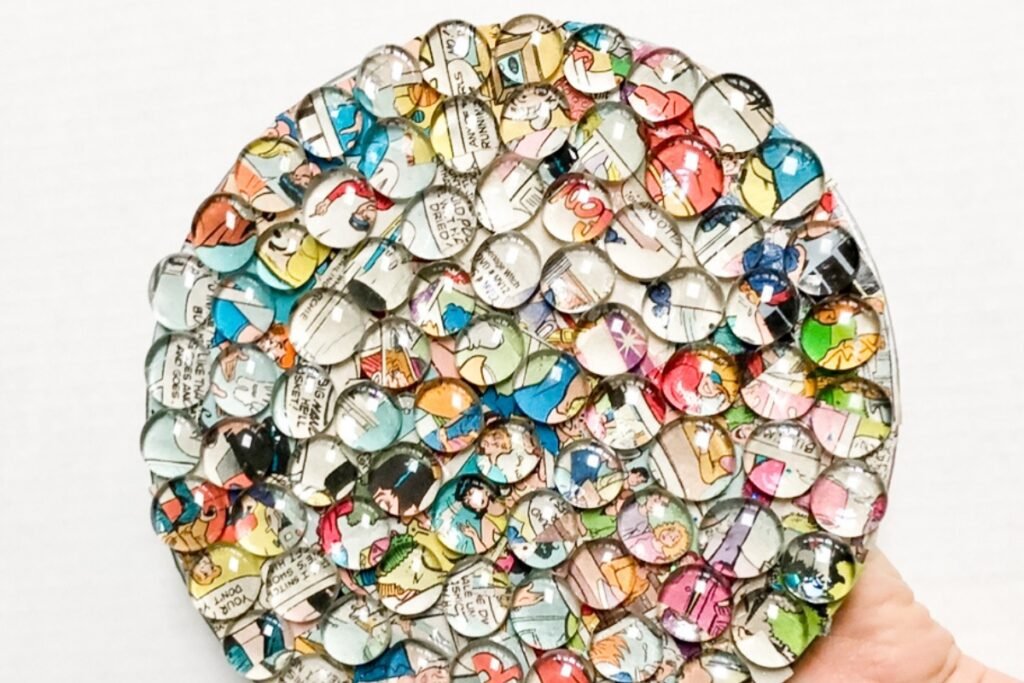
Finished DIY glass marble trivet
Here are a few tips to ensure success when crafting with glass flat back marbles:
1. You can purchase glass gems at your local craft store like Hobby Lobby or Michaels. You can also find them online. However, I have found that the best place to find them is in the craft or floral section at dollar stores.
I've also seen them quite often at my local thrift store. You might be surprised by how many good art supplies there are at thrift stores.
2. Once you've created your trivet, experiment with other projects using flat marbles. A great project for beginners would be to make garden orbs. These are so much fun and look great outside.
Other craft ideas using flat glass marble include coasters, picture frames, glass marble magnets or even a marble necklace. The reason I love the collage elements so much is because it's a great way to customize your art which makes it just a little bit more personal than someone else using the same technique.
This flat back cartoon/collage marble trivet is a satisfying project that allows you to combine creativity with functionality. Whether you're making one for yourself or as a thoughtful gift for a friend or loved one, following these steps will help you create a beautiful and durable trivet that will be cherished for years to come.
So gather your materials, unleash your creativity, and enjoy the process of bringing your unique design to life!
Looking for more marble crafts? Check out this post on how to make your own marble magnets!